Loop Hero is a tough roguelite that takes a good amount of grinding and RNG to complete. If you’re struggling with the Chapter 4 boss, we’ve got a guide for you to help out. When I first tried to complete this chapter, I noticed a significant lack of tips and tricks for beating it. This is why I’ve gathered a bunch of tips from what I’ve learned and found online. Continue reading below for our Chapter 4 guide.
As this is a long guide, we’ve included a Table of Contents below to help you find what you’re looking for. Clicking any of the table links will bring you to a section. While certain areas focus more on Rogue advice, there are tips for every class.
How to Beat Chapter 4 in Loop Hero
Beating Chapter 4 as the Rogue Class

The first few guides I came across while trying to beat Chapter 4 were bonkers with useless cards. Stuff like Treasury cards and skipping out on Rivers. But finally, I came across a few posts that made me rethink my strategy as the Rogue class. Many of us playing Rogues in Loop Hero know that Attack Speed and Evasion is a strong strategy. Especially in the earlier chapters where the monsters are easier.
However, not many people in the Loop Hero community are discussing how strong Critical Hit Chance can be. The unfortunate reality is that the Attack Speed stat suffers from the stamina mechanic. Essentially, if you attack too quickly in a short span of time, you’ll drain your stamina. Until your stamina recovers, you’ll attack slowly and supposedly have a much lower chance to evade. This doesn’t mean you should ignore Attack Speed, but you shouldn’t go all-in either.
Camp Buildings to Prioritize
Once I started focusing more heavily on Critical Hit Chance, I started blowing through Chapter 4. However, it’s still important to make and upgrade your camp buildings. Getting the Alchemist’s Tent helped significantly with upgrading my camp. Some camp advantages are listed below:
- Level 2 Cemetery – Reviving at 15% hp once during an expedition. Further upgrades increase the health amount.
- 4 Watchtowers – 4 Crossbowmen helping during non-boss fights near the campfire tile.
- Level 5 War Camp – 20% hero strength increase which possibly refers to weapon damage.
- Upgrading the Field Kitchen – Higher campfire healing as well as resting before fighting a boss at level 3.
- Upgrading the Herbalist’s Hut – More healing potions and higher healing from potions.
Camp Supply Items For Chapter 4
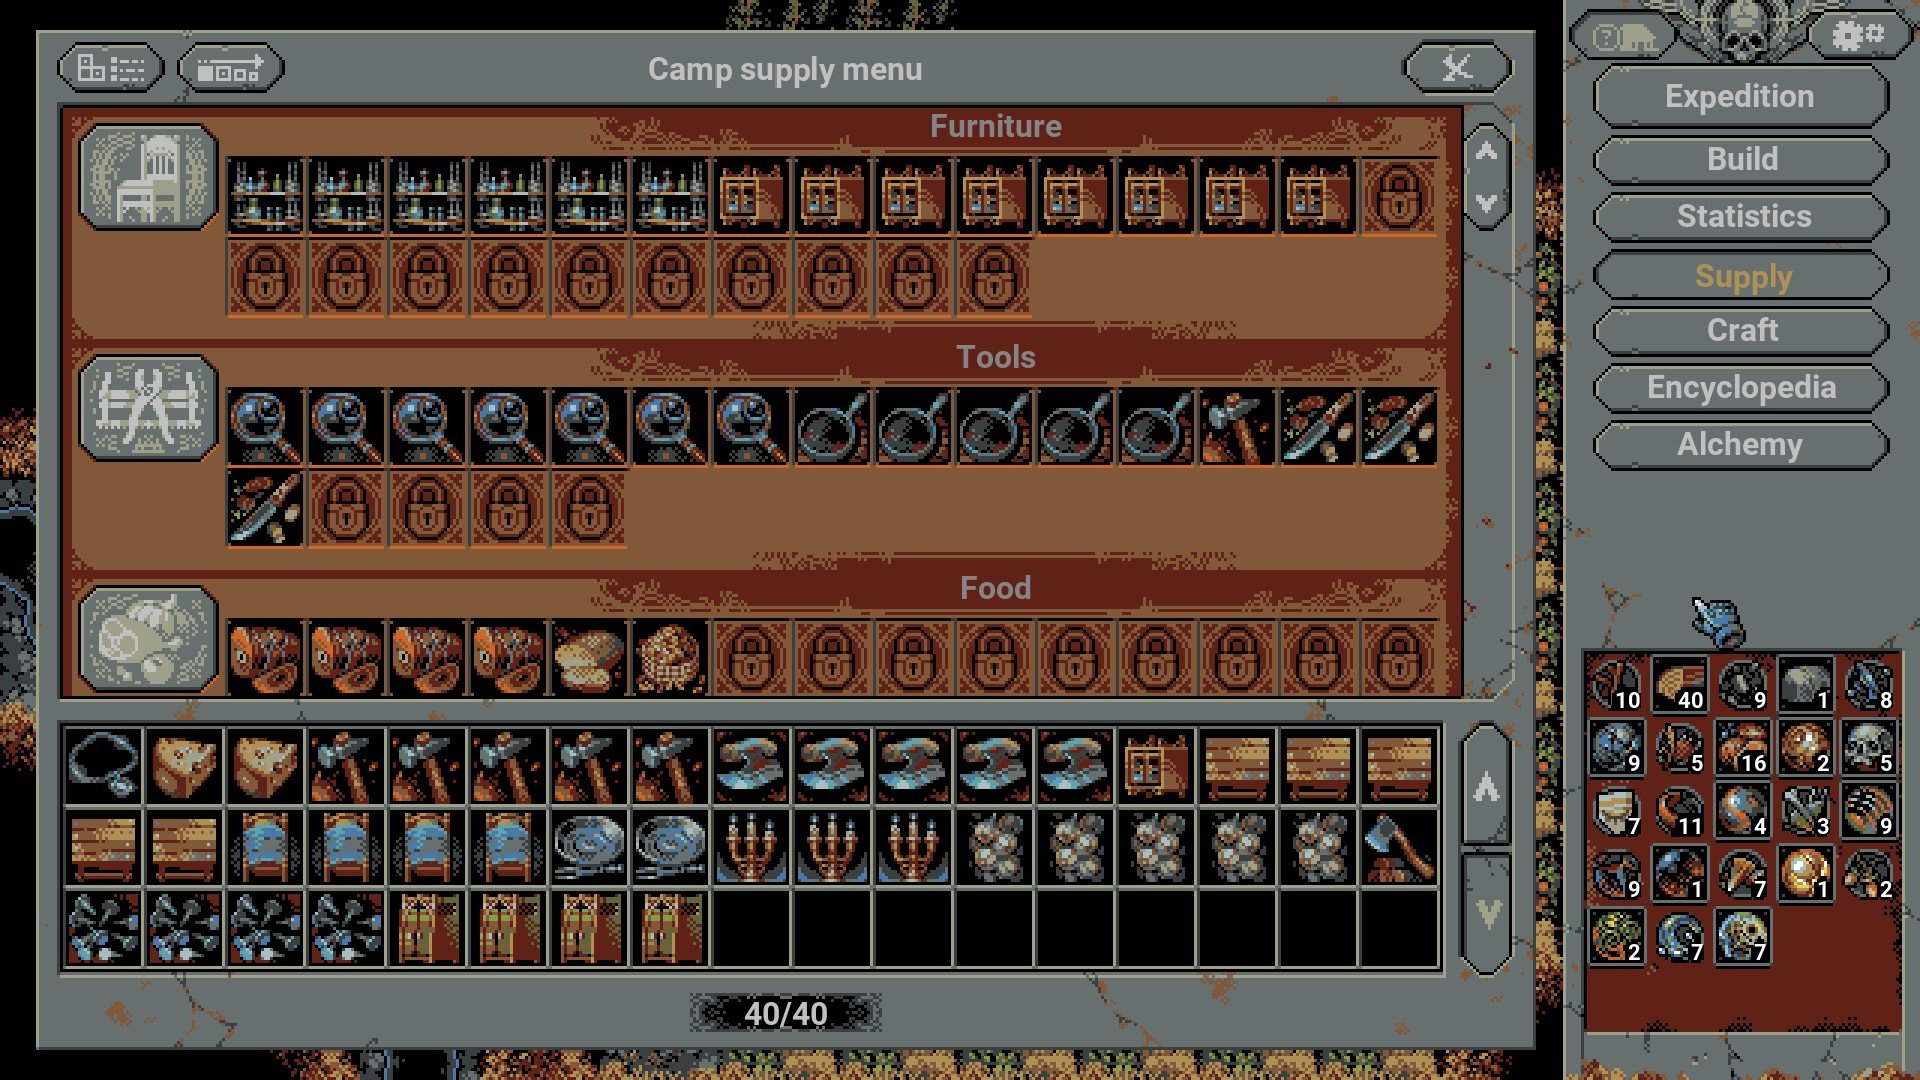
Taking advantage of Loop Hero’s metagame via supply items makes a big difference too. Even if you only stack a bunch of Alchemist’s Shelves for extra potions. For an idea of what items I used in my run, take a look at the screenshot above. The fourth Jewelry row isn’t visible, but I had one Brass Candlestick and three Old Paintings. Items used in my run are detailed below.
*Items marked with an asterisk are recommended
| Alchemist’s Shelf* | +1 max healing potions. |
| Antique Shelf | +1 max hp for every whole resource gained during this expedition. Mainly a filler item for me. |
| Jeweler’s Lens* | Raises the chance of finding a rare item by 10%. |
| Old Frying Pan* | Additional +15 hp healed at the campfire tile. |
| Blacksmith’s Hammer | +1 Defense, filler item. |
| Kitchen Knife | +1% base hp for every food item. |
| Smoked Ham | +5 hp at the start of each day. |
| Loaf of Bread | +10 max hp. |
| Mixed Nuts | +2 max hp for every point of defense. Filler item as Rogue. |
| Brass Candlestick* | +5% damage when near a Road Lantern or Beacon. |
| Old Painting* | +4% damage done to the boss. |
Chapter 4 Card Deck
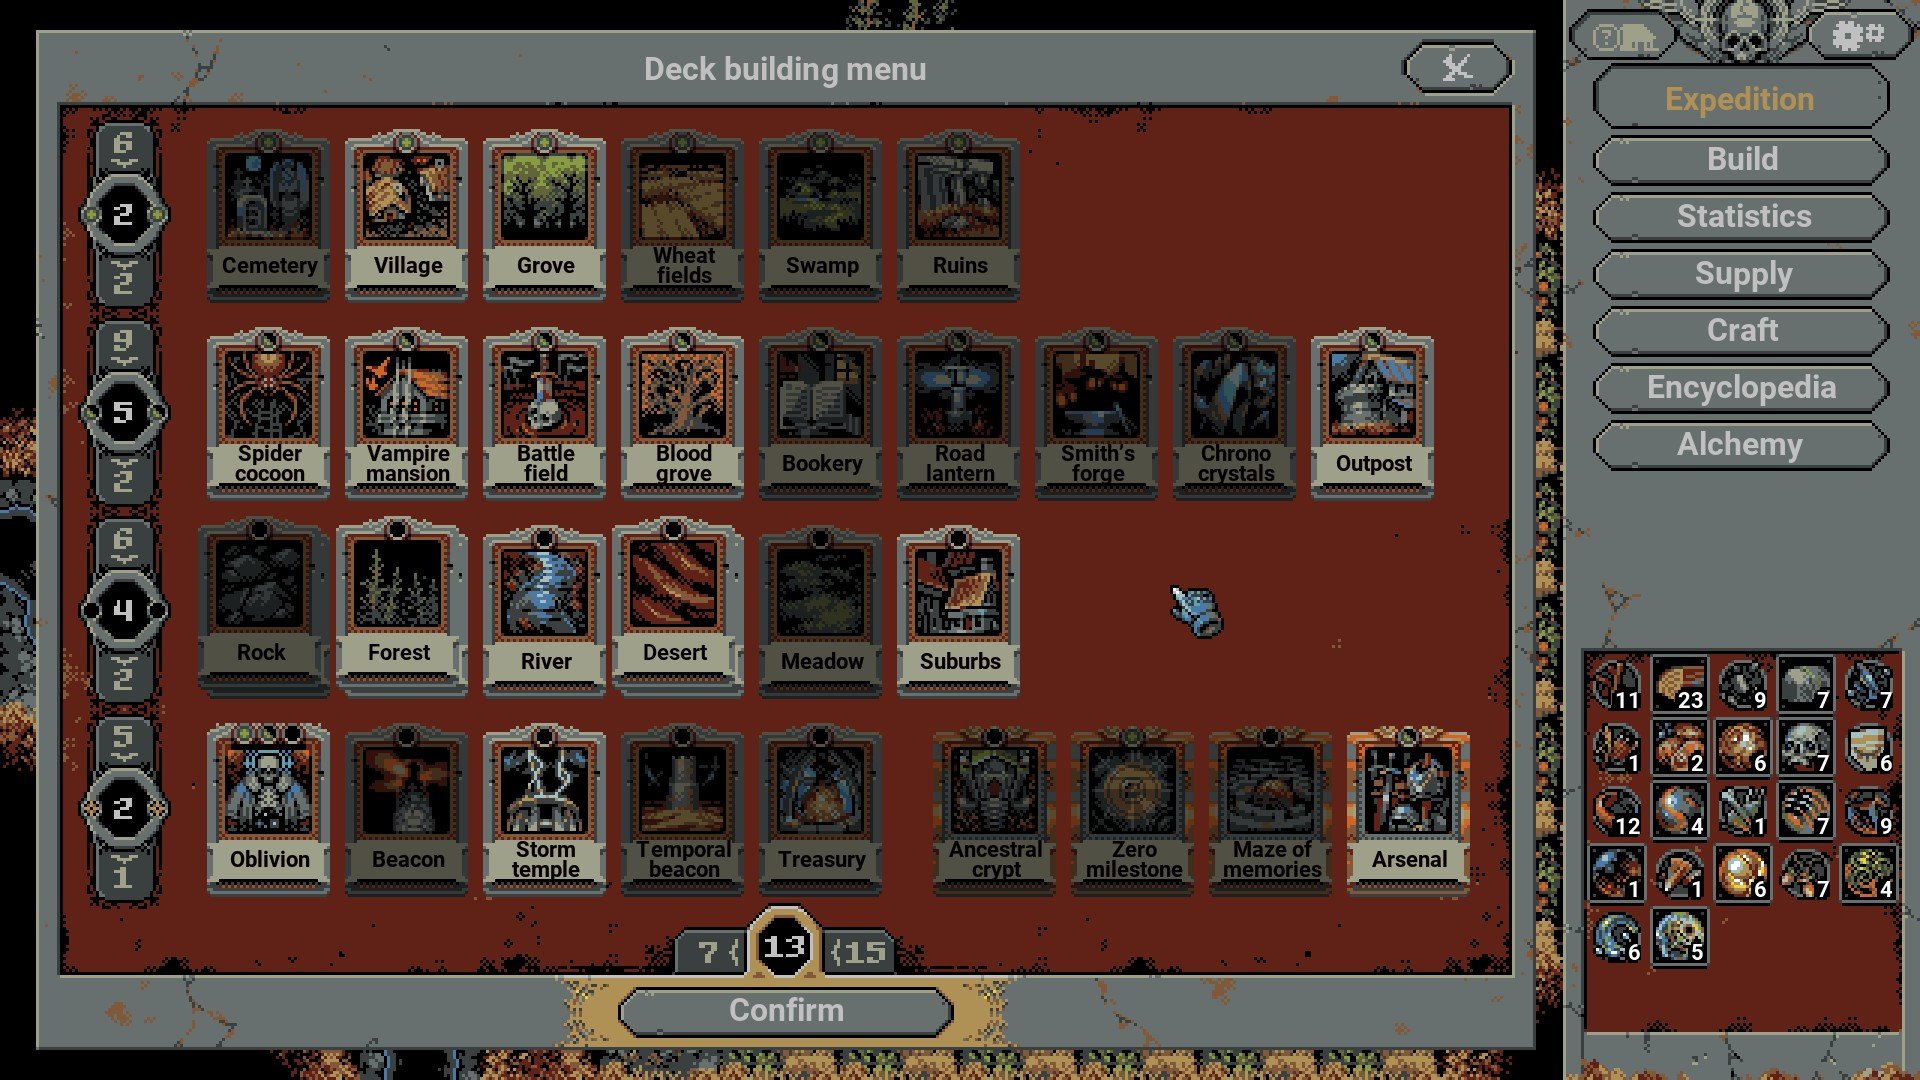
This is the deck I used for beating this chapter, but you can get away with some changes. I’ve added notes next to every card for why I took it. If you’d prefer to skip to the general tips and tricks section, click here.
| Village | Good for turning into a Ransacked Village early on to farm cards and trophies as a Rogue. |
| Grove | I only recommend one for a Blood Grove/Hungry Grove. The third Ratwolf trait makes them a pain to deal with. They can’t take damage higher than 30% of their max hp in one hit. |
| Spider Cocoon | Good for farming cards/trophies. |
| Vampire Mansion | Needed for converting villages to Ransacked Villages. Plus, they’re an extra enemy for cards/trophies if you can handle them. |
| Battle Field | Didn’t need this card in my deck, but it’s good for Warrior and Necromancer. Otherwise, you can get trophies from ghosts spawned by it. Or get lucky with Prime Matter spawns. |
| Blood Grove | Kills enemies, including bosses with 15% health left. Can be converted to a Hungry Grove for 20% health instead. |
| Outpost | Don’t use this if you’re a Necromancer. Otherwise, place two adjacent to the campfire to help with bosses. If you’re a Warrior, you’ll probably only want to do that. Rogues don’t lose items from Outposts, however. |
| Forest/Thicket | Thickets for high attack speed, Forests for the Storm Temple. |
| River | Doubling the buffs of adjacent landscapes, primarily Thickets. |
| Desert/Sand Dunes | Sand Dunes for lowering enemy health, including bosses. Deserts are good for placing if you’re trying to speed up the boss meter. |
| Suburbs | The extra bonus experience per kill is significant enough to get game-changing traits. |
| Oblivion | Required for creating a Hungry Grove. Also, useful for removing “A Village?” tiles that are rough for Rogues. Good for removing Lich Palaces too. |
| Storm Temple | Useful for Magic Damage by burning Forests. |
| Arsenal | Rogue players should always use Arsenal. While Necromancers should always use Ancestral Crypt. Some people have skipped bosses using Maze of Memories, however. |
Quick Trait Recommendations
As this guide is already quite long, I’m quickly listing traits that I recommend for each class. If you want some extra info on why, feel free to ask in the comments below the article.
| Warrior |
|
| Rogue |
|
| Necromancer |
|
General Chapter 4 Tips and Tricks
Here are some general tips for every class. If you have some of your own, feel free to comment below the article to help others out. Also, there are screenshots further down with my stats before each boss except the first; since I didn’t get one at the time. For what it’s worth, I went a little crazy with landscapes since I didn’t expect to win. Our river placement guide is much more useful here.
- Rogues should prioritize Attack Speed and Critical Hit Chance early on. Some Evasion is good, but it’s not your focus. You’ll get some organically from boots.
- Necromancers benefit heavily from Attack Speed for summoning skeletons. However, Skeleton Level and Max Skeletons are still significant for keeping your damage up. Some Skeleton Quality will help you get Skeleton Guards if you’re Magic HP is low.
- Warriors should focus Attack Speed and raising their overall stats, over time.
- Place two Outposts adjacent to the campfire for help with bosses.
- Use Hungry Groves for killing bosses when they hit 20% health.
- Don’t be afraid to place weaker landscape tiles. The higher the loop level gets, the more of a struggle you may have.
- Necromancers should prioritize spawning enemies with souls to get more health from Ancestral Crypt.
- As mentioned in a different section, prioritize upgrading camp buildings and getting supply items. They can make a major difference. If you have Watchtowers, prioritize placing enemies near your campfire.
- Lich Palaces spread two tiles away, unlike Chapter 1.
- Suburbs make a huge difference in getting traits quicker. This will help all the way through your run, from start to finish.
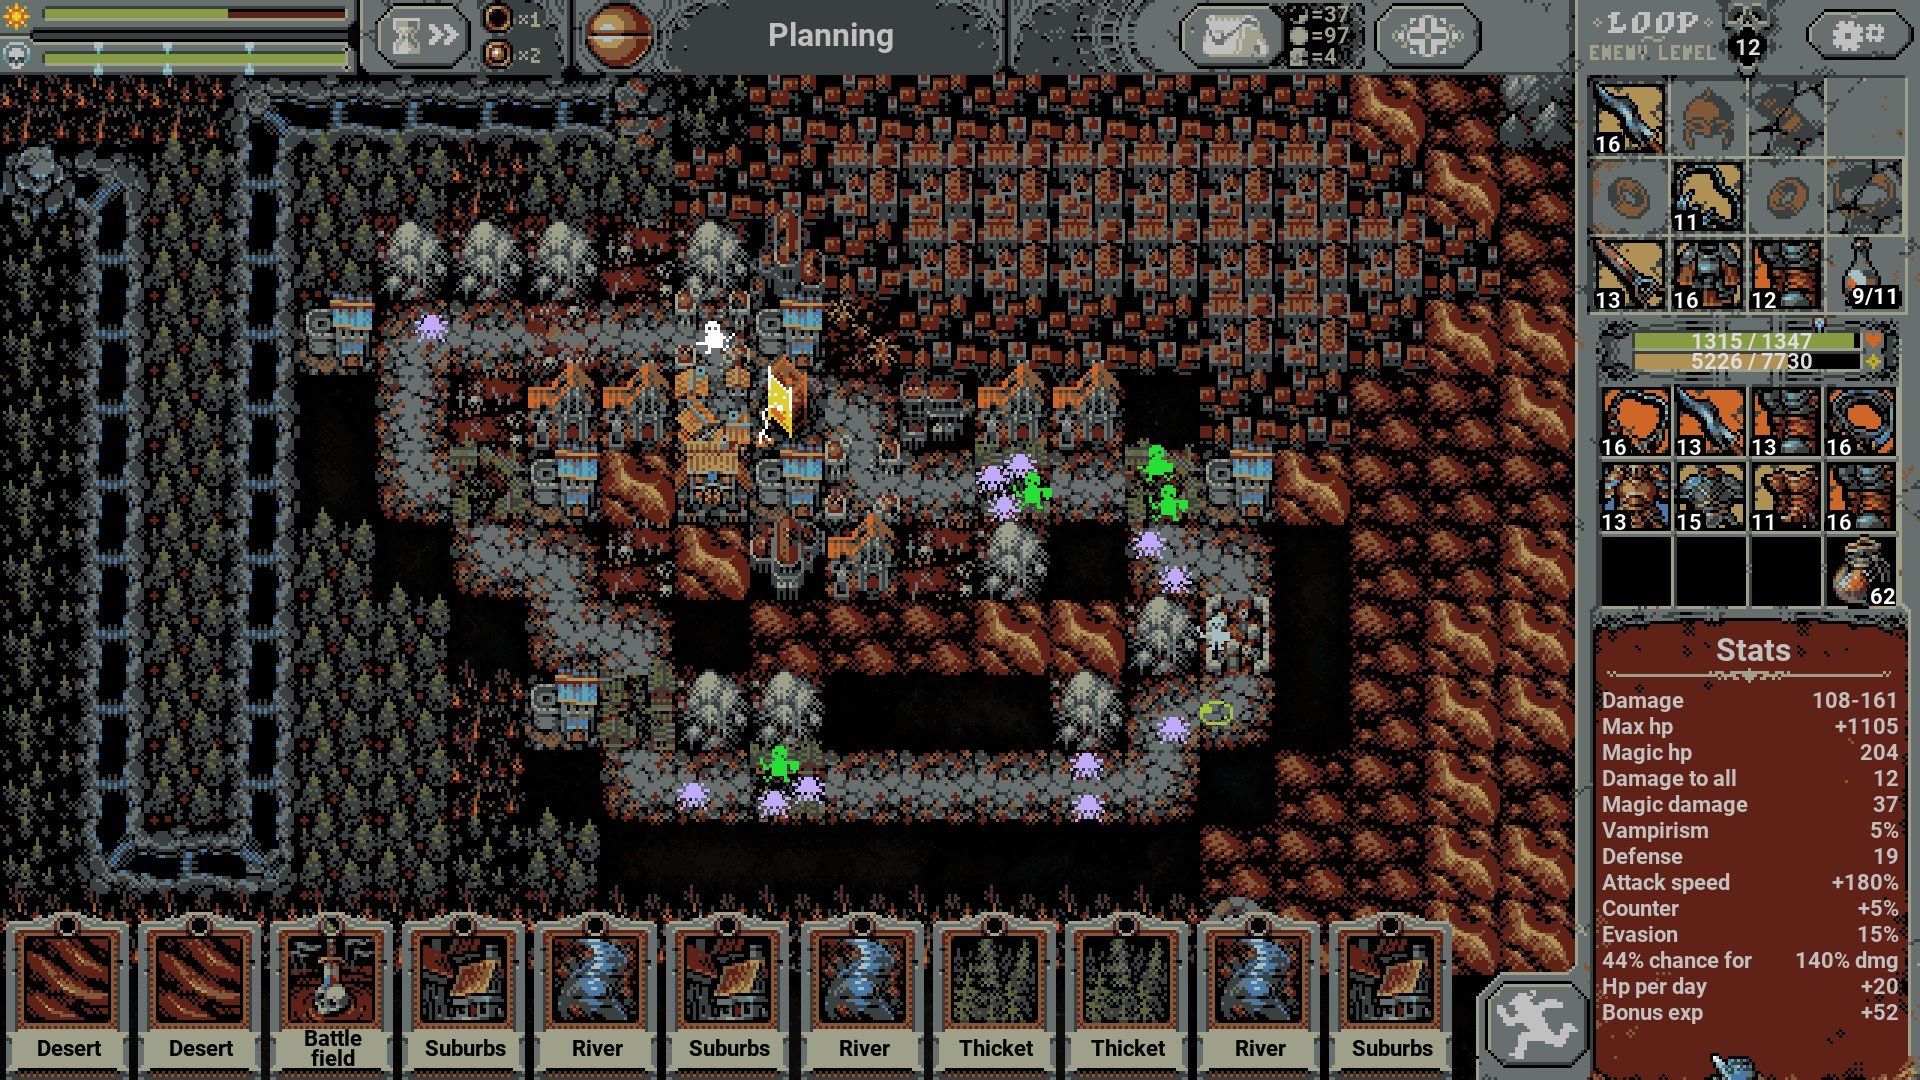
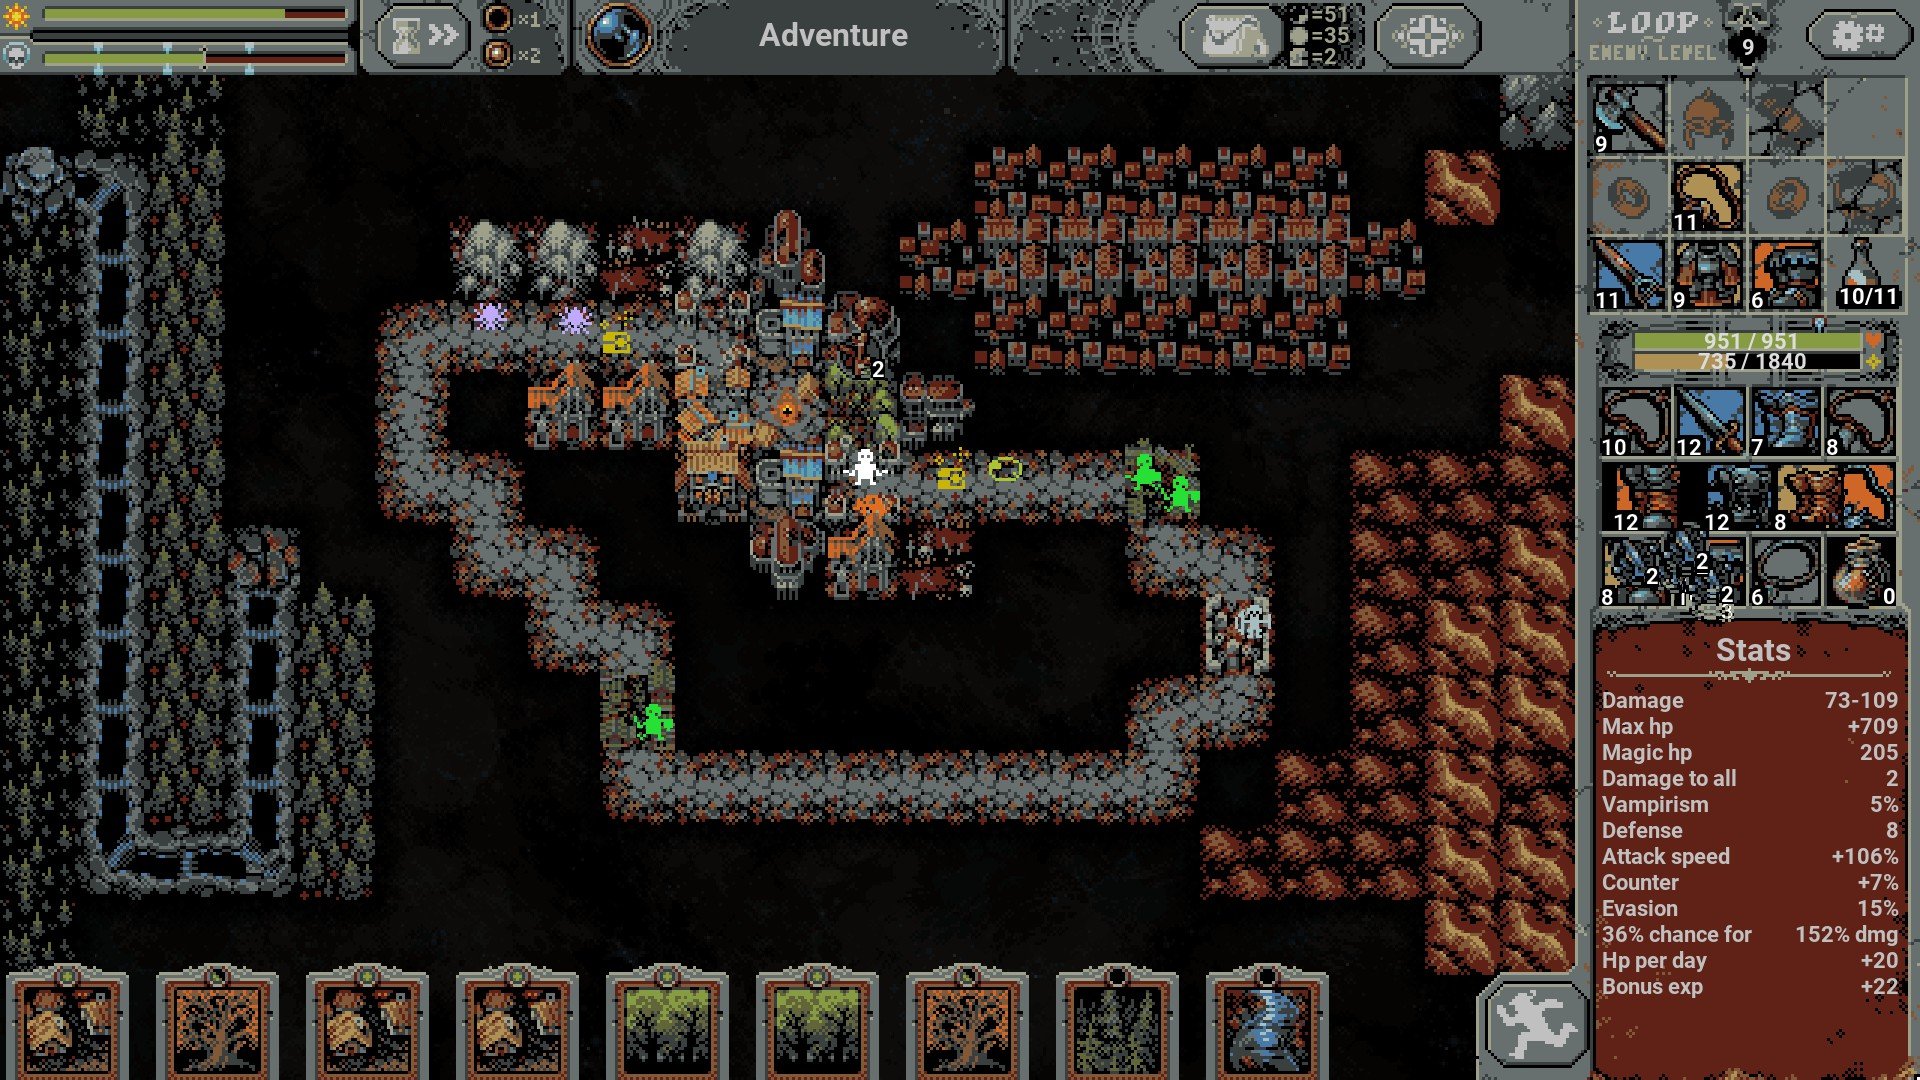
Stats Before the Second Boss (Click Image to Expand)
Stats Before the Third Boss (Click Image to Expand)
Stats Before the Fourth Boss (Click Image to Expand)
What to Know About the Final Boss
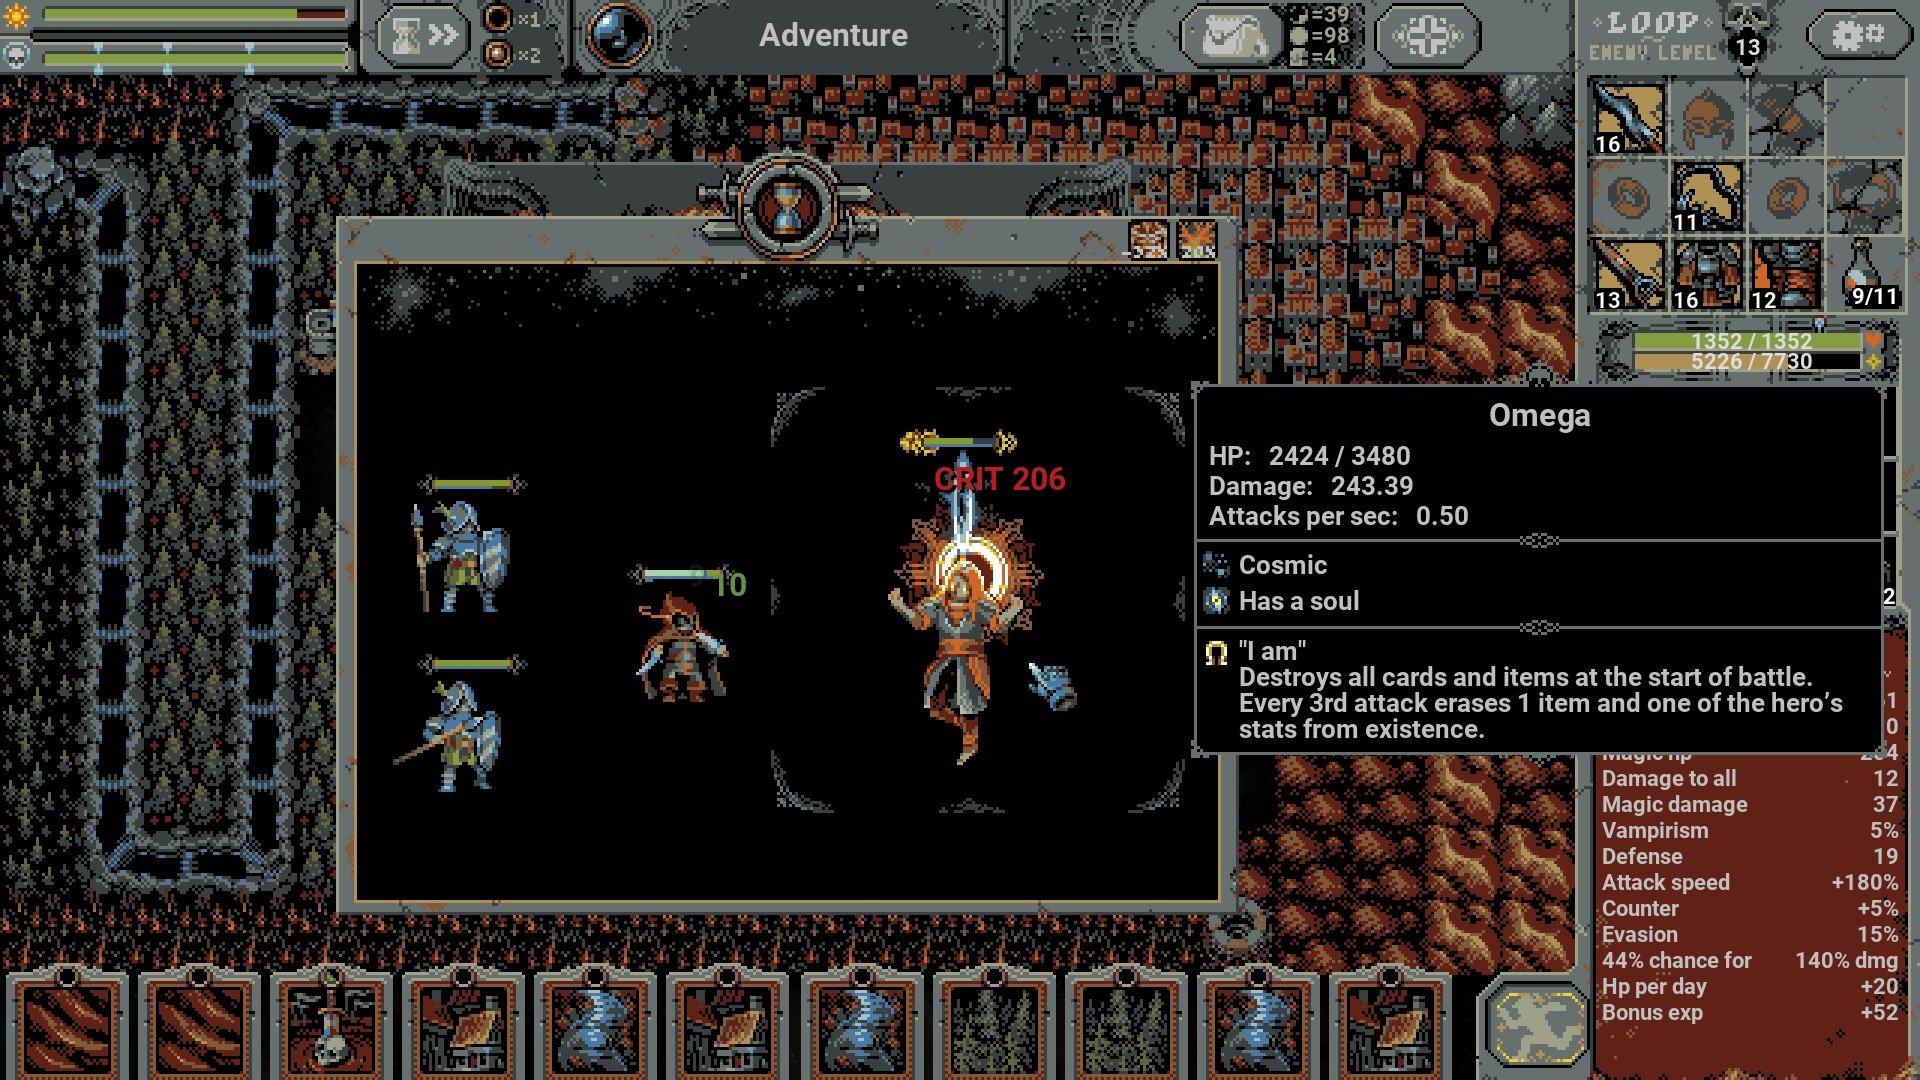
The main thing to know about the Chapter 4 boss, Omega, is their trait. The trait “I am” shown in the above screenshot can ruin your run via RNG. The description is, “Destroys all cards and items at the start of battle. Every 3rd attack erases 1 item and one of the hero’s stats from existence.” This means for every third attack by Omega, you’ll completely lose an item or stat.
By the end of the fight, I lost a weapon, my Damage, Damage to All, Magic Damage, and Bonus Exp. Going off memory, I’m assuming it didn’t remove my damage entirely as I still killed Omega. Otherwise, it’s worth mentioning there aren’t any adds/extra enemies to worry about. You just need to focus on taking care of Omega.
While this Loop Hero guide is quite extensive, I hope some of the tips and tricks here help you beat Chapter 4. For more help, I recommend visiting the Loop Hero Discord channel here. There’s a large community there that may help you quicker than I can. Otherwise, you can take a look at our guide hub here and other useful guides below.


Jeff is a journalist with over 10 years of experience writing, streaming, and making content about video games. With an associate degree in journalism, he’s a sucker for RPGs, survival games, roguelikes, and more.
sophie
Saturday 27th of March 2021
hello ! thank you very much for the guide ! i am trying my first attempt right now ! just somthing i noted, you don't need grove to make bllod grove, forest is enough for that, and you don't polluted your hand ! i'll tell you later if your strategy worked for me, but anyway I liked the guide, and rogue is my favourite class !
Jeffrey Lerman
Saturday 27th of March 2021
Good point Sophie, I forgot about that. You can definitely get away with a good Forest/Thicket placement. That certainly makes it easier to get the cards you want if you don't plan on fighting Ratwolves. Good luck with your attempt as well. I'm not an expert on the chapter, but I wanted to share what worked for me.