The first Payday 3 heist most players will start with is No Rest for the Wicked. I’ve put together this guide and full walkthrough for both how to complete it loud and stealth. So regardless of which method you’d prefer, I’ve got you covered.
For those wondering, this walkthrough is completely based on my own experiences and I currently have 34 hours in Payday 3. My level is only 39 so far since the leveling system is a bit odd as explained in my best tips and tricks guide. That aside, this guide is based on Normal difficulty even though a lot of it still applies to higher difficulties.
No Rest For the Wicked Loud – No Rest For the Wicked Stealth
No Rest For the Wicked Loud Walkthrough
Going loud is often the simpler strategy for many Payday 3 heists as long as it’s not a stealth-only one. Fortunately, No Rest for the Wicked isn’t too bad on the lower difficulties but you’ll still want to take advantage of the negotiation phase. Here are the mission steps with in-depth explanations below:
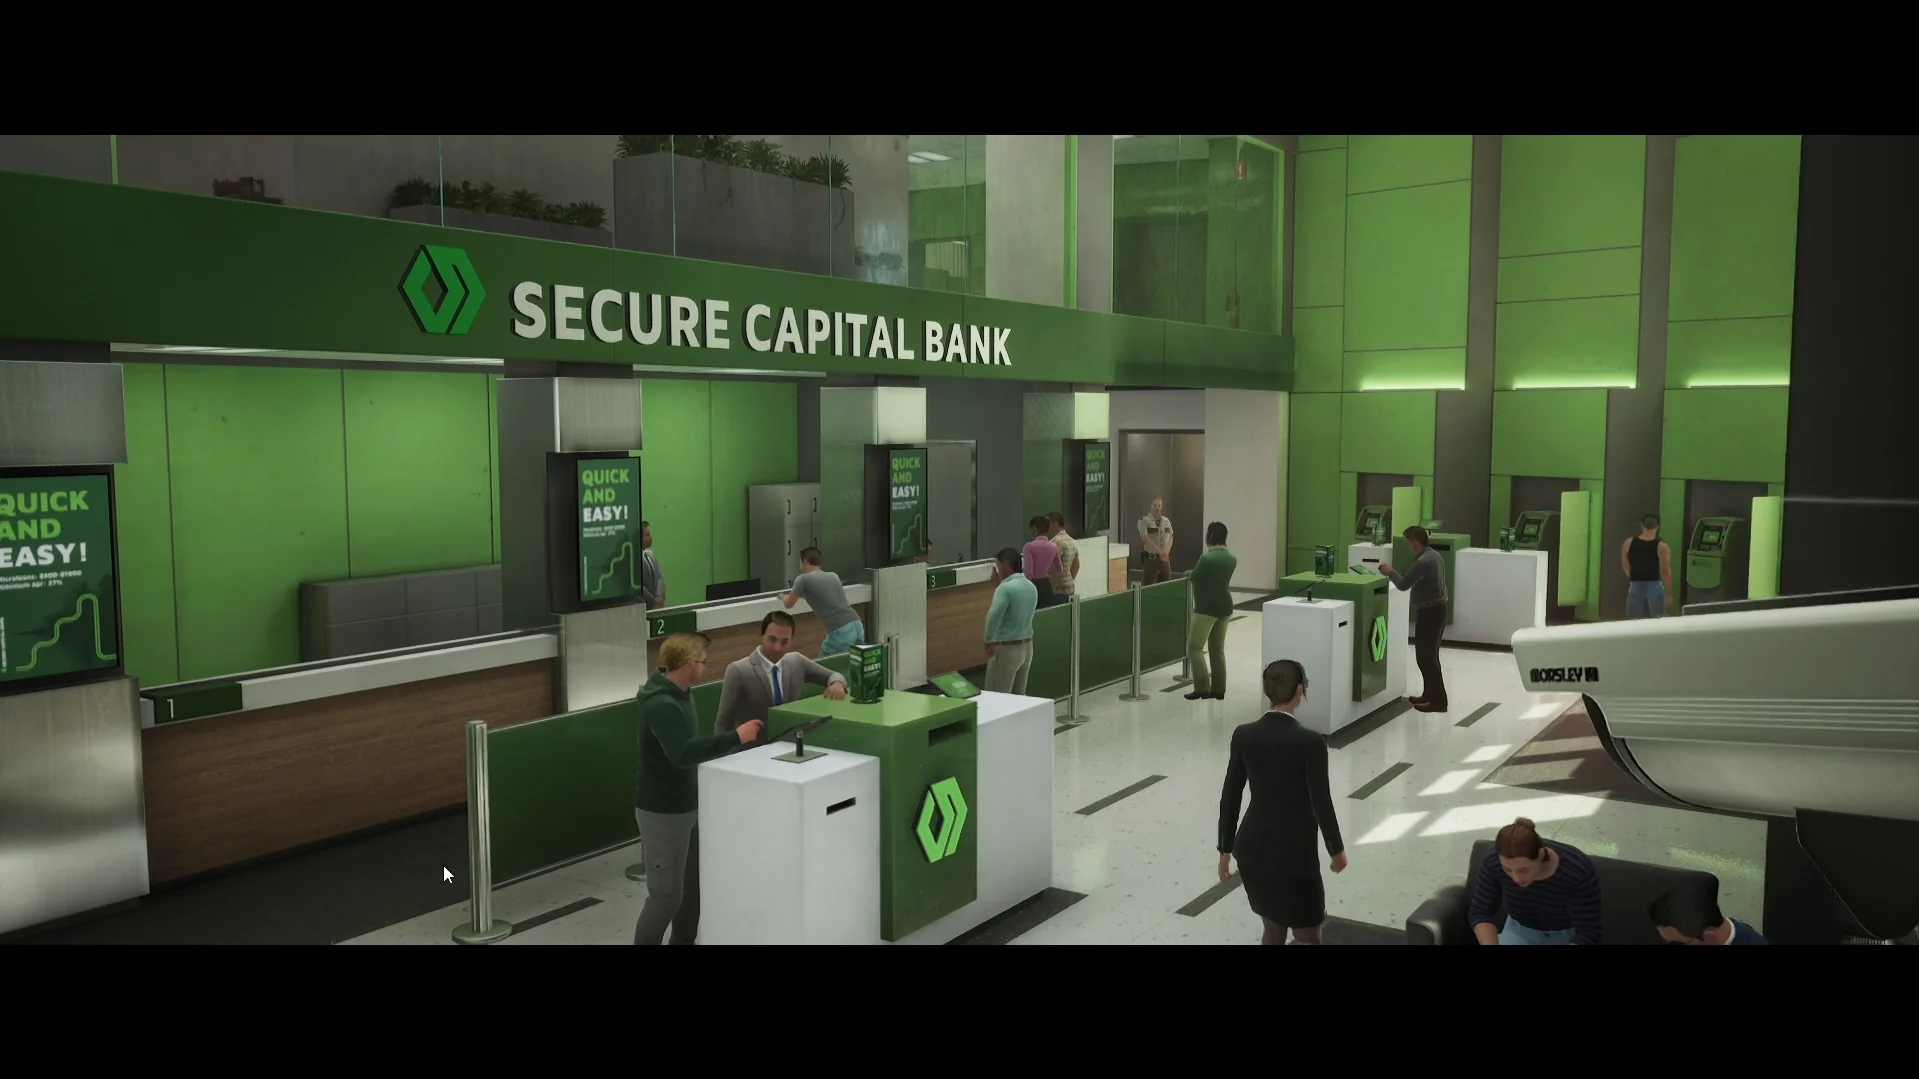
- Enter the bank.
- Set up the thermite. (Triggers once the alarm does)
- Hold for equipment drop.
- Clear the area.
- Collect the thermite.
- Place the thermite.
- Ignite the thermite.
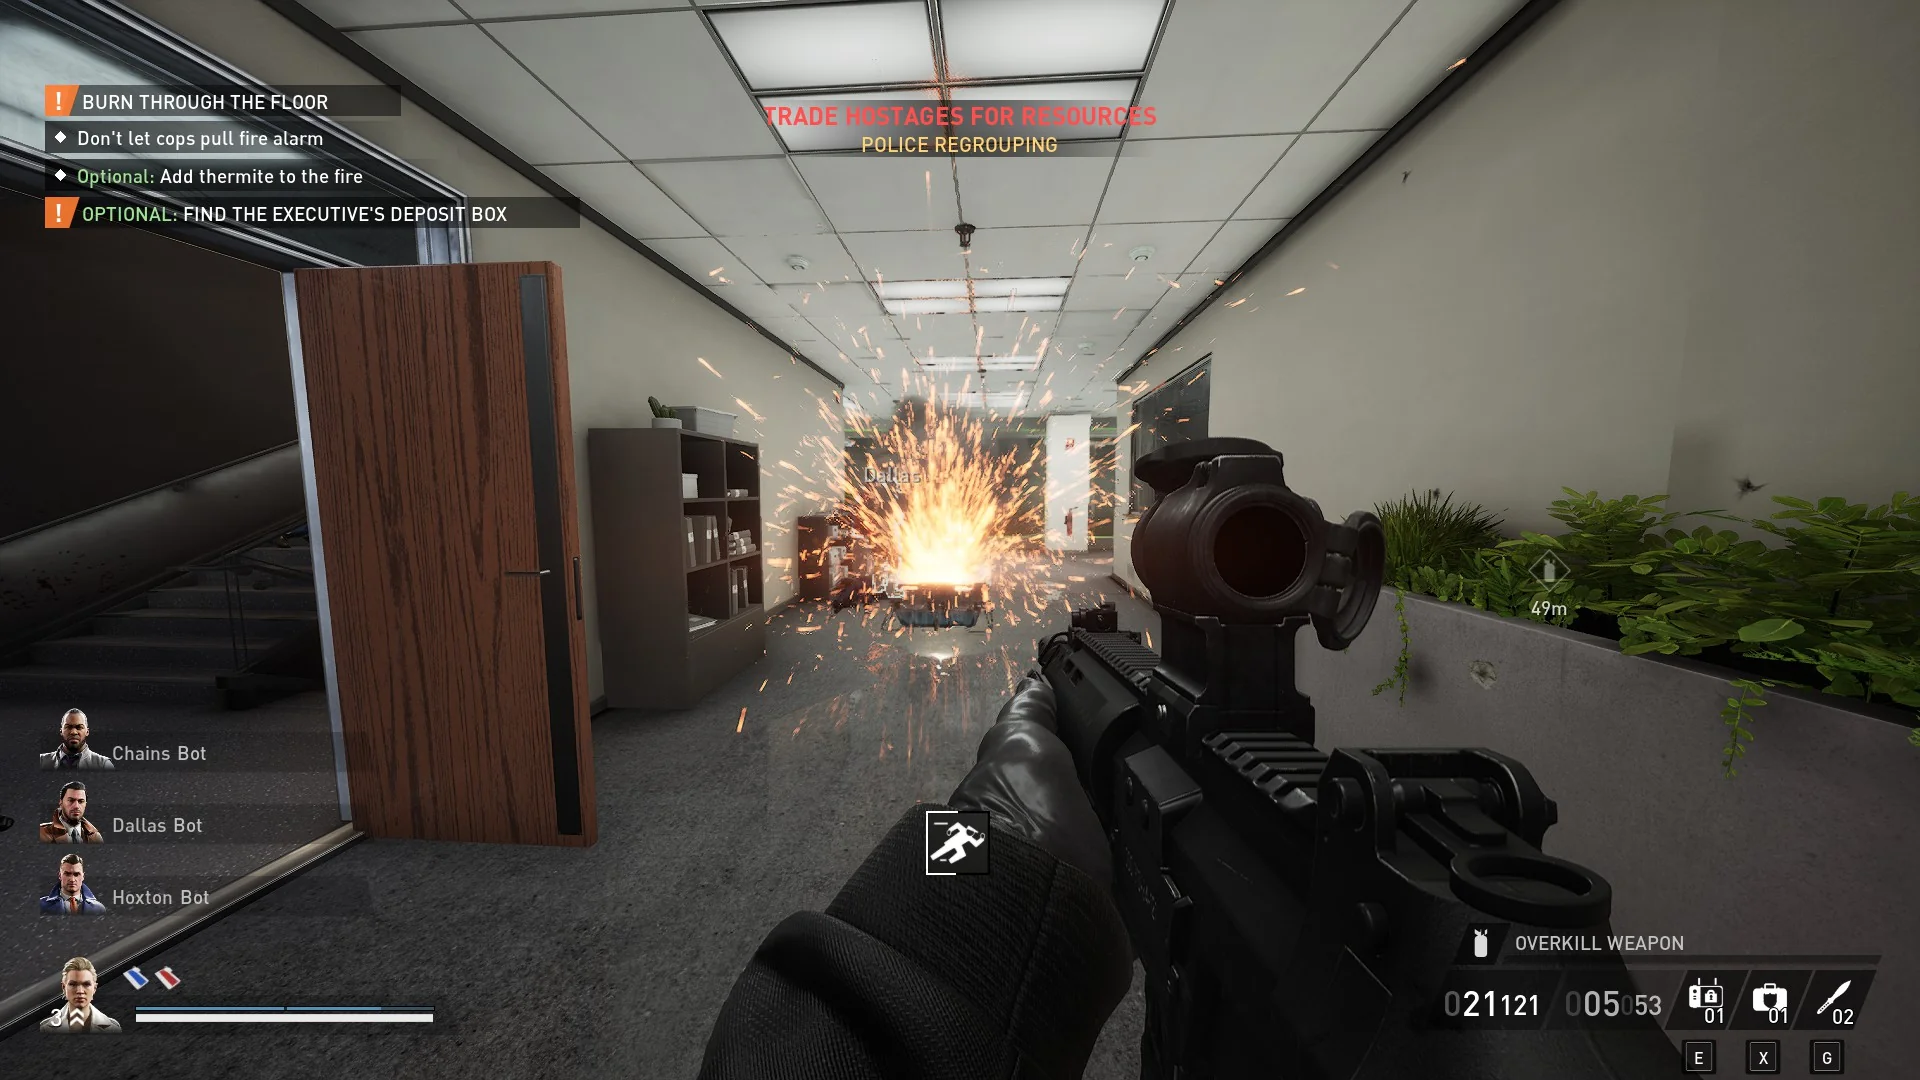
- Burn through the floor.
- Don’t let the cops pull the fire alarm.
- Optional: Add thermite to the fire.
- Disable the sprinklers. (If they’re turned on)
- Enter the vault.
- Optional: Find the executive’s deposit box.
- Loot the vault.
- Disarm the dye packs 0/8.
- Reach the rendezvous point.
- Clear the area.
- Lower the bollards 0/2 (amount depends on difficulty)
- Hold out until the getaway arrives.
- Steal and secure money.
- Escape
- Optional: Secure all loot.
1. Enter the bank.
This step is mostly self-explanatory since all you have to do for this objective is enter the bank. Afterward, the objectives will continue guiding you toward the stealth route. While we’re not going quiet, it’s worth interacting with the shutter buttons on the inside of the bank. They look like white light switches along the windows in the lobby.
Each one will close the shutters for a set of windows without causing any suspicion. The main benefit of this is that cops can’t come in through the windows or attack you from them. Once you’re finished, continue to the next step for the loud walkthrough.
2. Set up the thermite.
2.1. Once the alarm triggers you’ll want to start telling hostages to get down by pinging them. Then, start tying them up so you can trade them for extra time during the negotiation phase. This is useful since you won’t have the thermite until a helicopter pilot drops it off. So if you’re stuck waiting, you may as well get the extra time.
2.2. The mini objective to clear the area isn’t anything significant so don’t worry about it. This is mostly if you’re still dealing with security guards inside the bank. While you can take them out, make sure to not run toward the police out front. Otherwise, this may force them to engage.
2.3. Once the helicopter pilot drops the thermite off, run out and grab it. This will be one blue bag that you should be able to grab without breaking the negotiation phase.
2.4. Make your way back inside the bank to the second floor where you can throw the thermite bag at a marked spot. Afterward, make sure you interact with the bucket of thermite to ignite it. This will stop the negotiation phase.
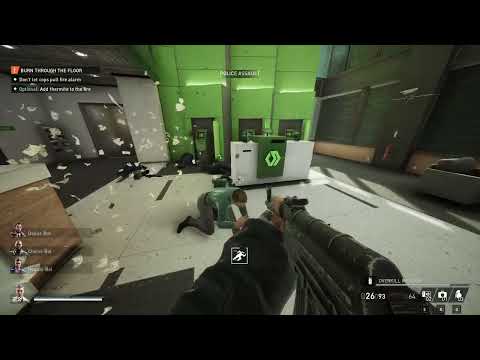
3. Burn through the floor.
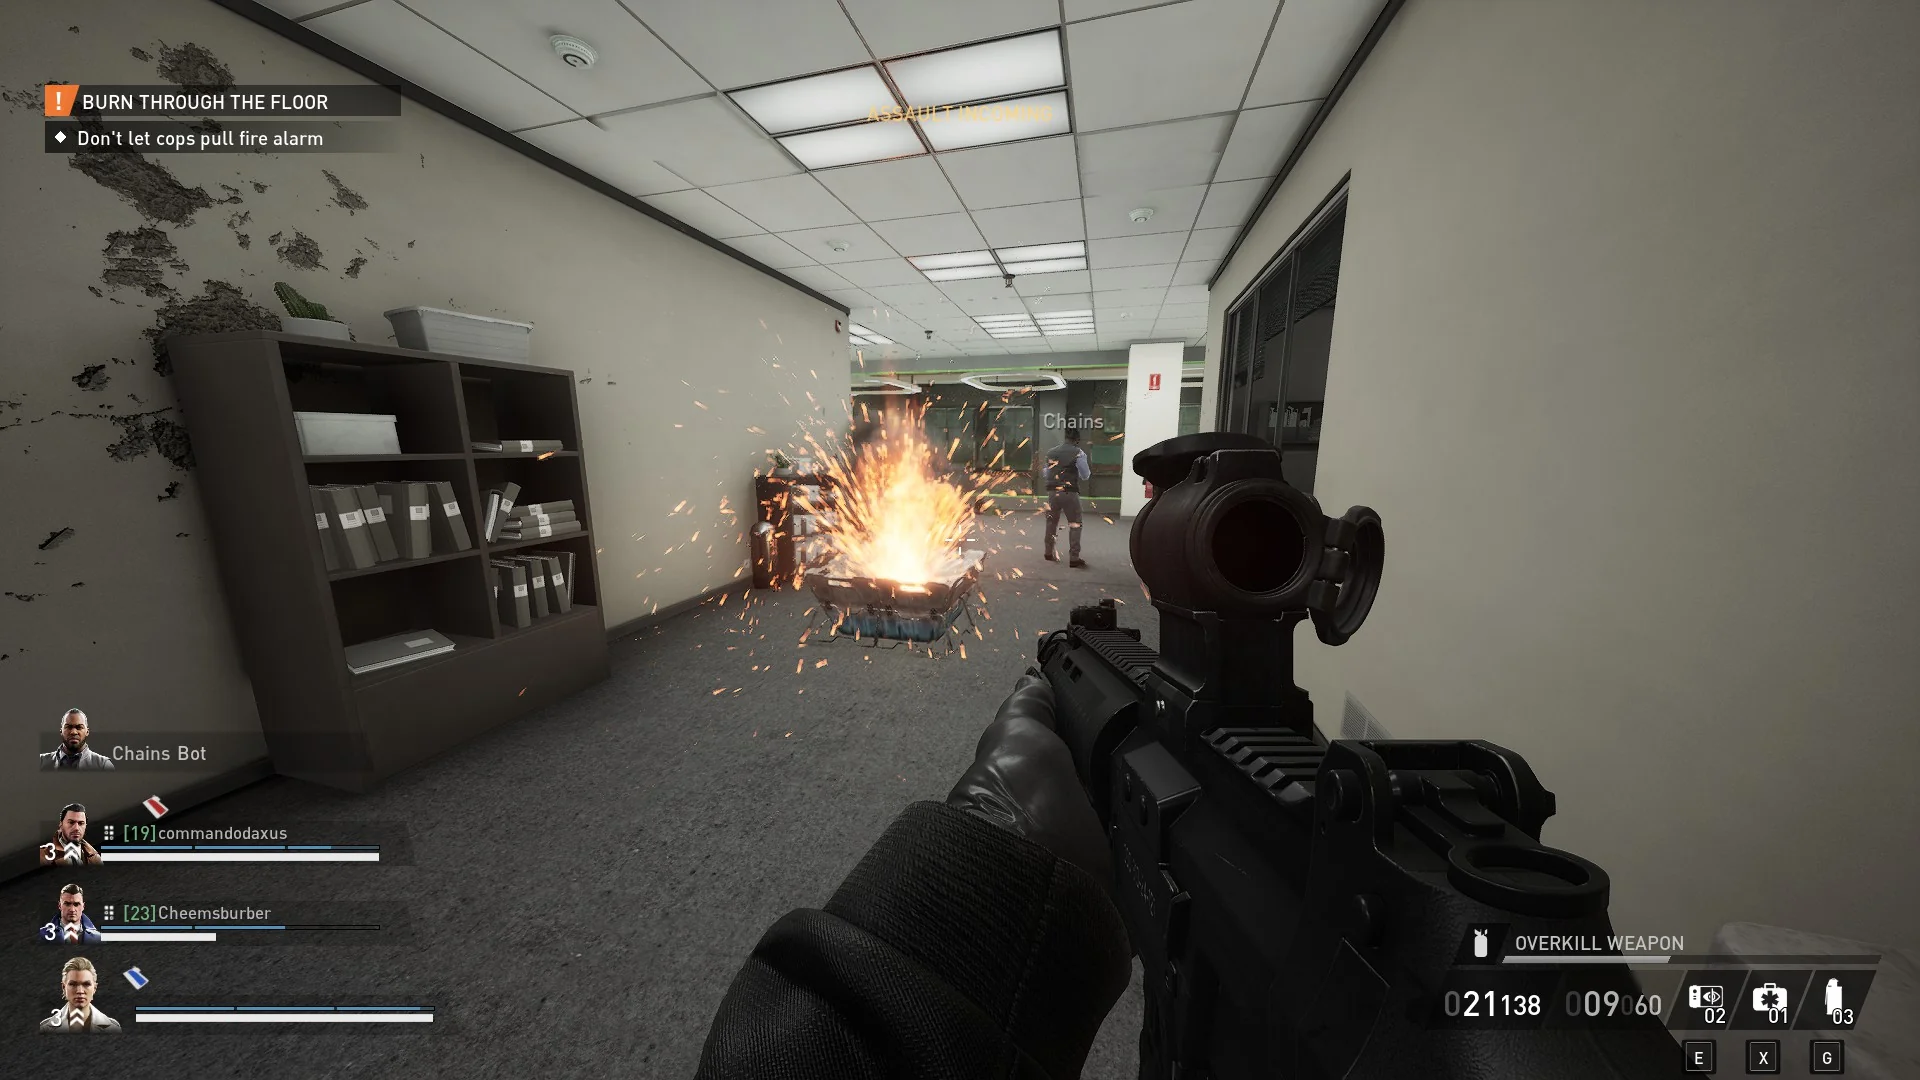
3.1. The mini objective to not let the cops pull the fire alarm can be difficult to watch. This is mostly tough since it’s hard to know where they’re going to pull it from. However, you will get a quick silhouette highlighting them when they start to. But, it doesn’t last long enough for you to stop them unless you’re nearby.
3.2. Make sure you grab the extra thermite bags that the helicopter pilot drops outside. The location will vary for each red bag so just look for the markers. Before you throw them into the thermite bucket, there’s an important tip here. If you put too much on at once, the fire alarm sprinklers will trigger. In order to avoid this, watch how high or low the thermite sparks are.
3.3. This step to disable the sprinklers is just if they’re turned on by police or triggered by too much thermite. Once the fire alarm activates, you’ll get a marker for where the sprinkler system controls are. It’s important to disable them since they slow down the thermite.
3.4. Once you’re finally finished burning through the floor, make your way inside via the hole. This will be where the bucket of thermite originally was. I like to wait for my teammates so we can all go in at once.
4. Optional: Find the executive’s deposit box.
This step is optional and I’m not sure what the reward is for getting the documents. From what I can tell, there isn’t a challenge so it isn’t experience-related. But, perhaps it counts as loose cash? Regardless, one set of highlighted folders in the bank will reveal the right deposit box to open. Otherwise, you can open them all since there are two bags of cash among the boxes anyway.
5. Loot the vault.
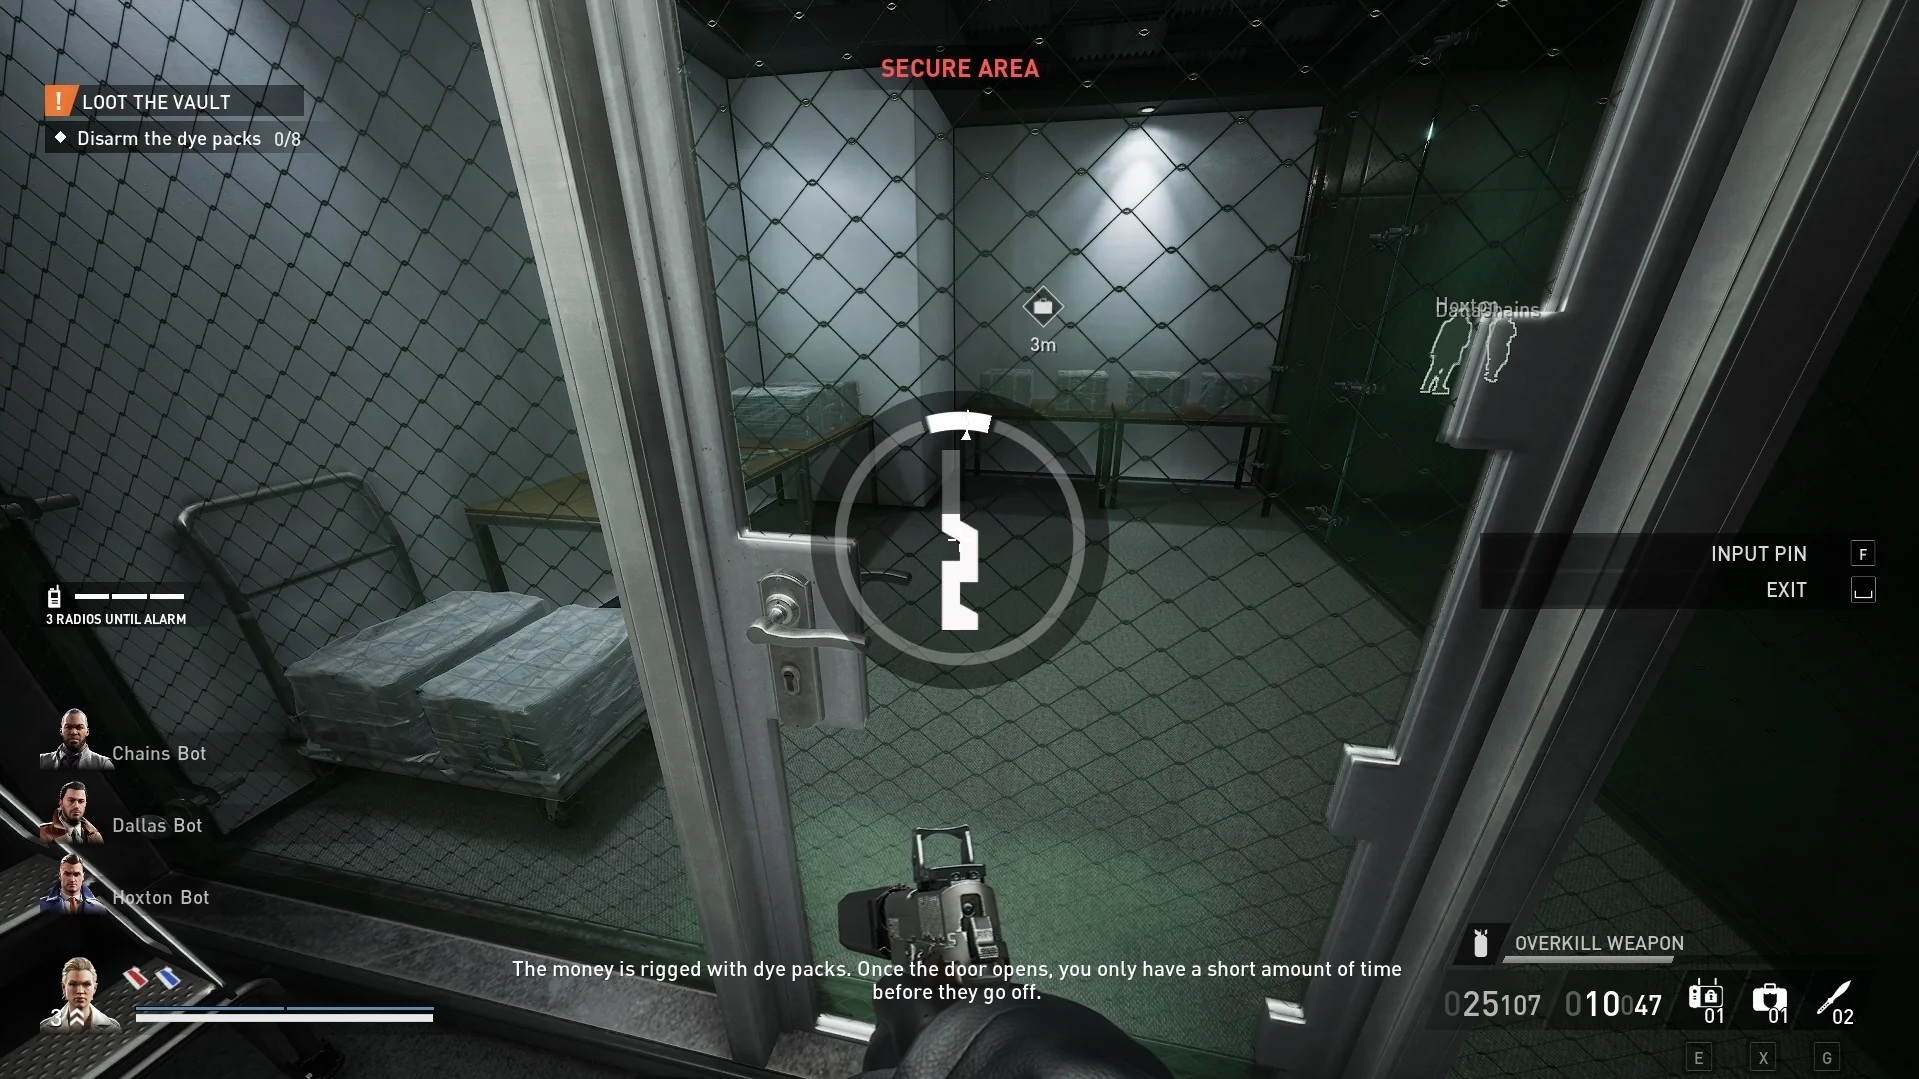
5.1. Make sure your team is together before opening the vault door or at least two of you are there. This is because you’ll need to disarm eight different dye packs inside the inner vault. And if you don’t do it quickly enough, the dye packs will explode. I’ve been able to disarm as high as six alone but even five is tough.
6. Reach the rendezvous point.
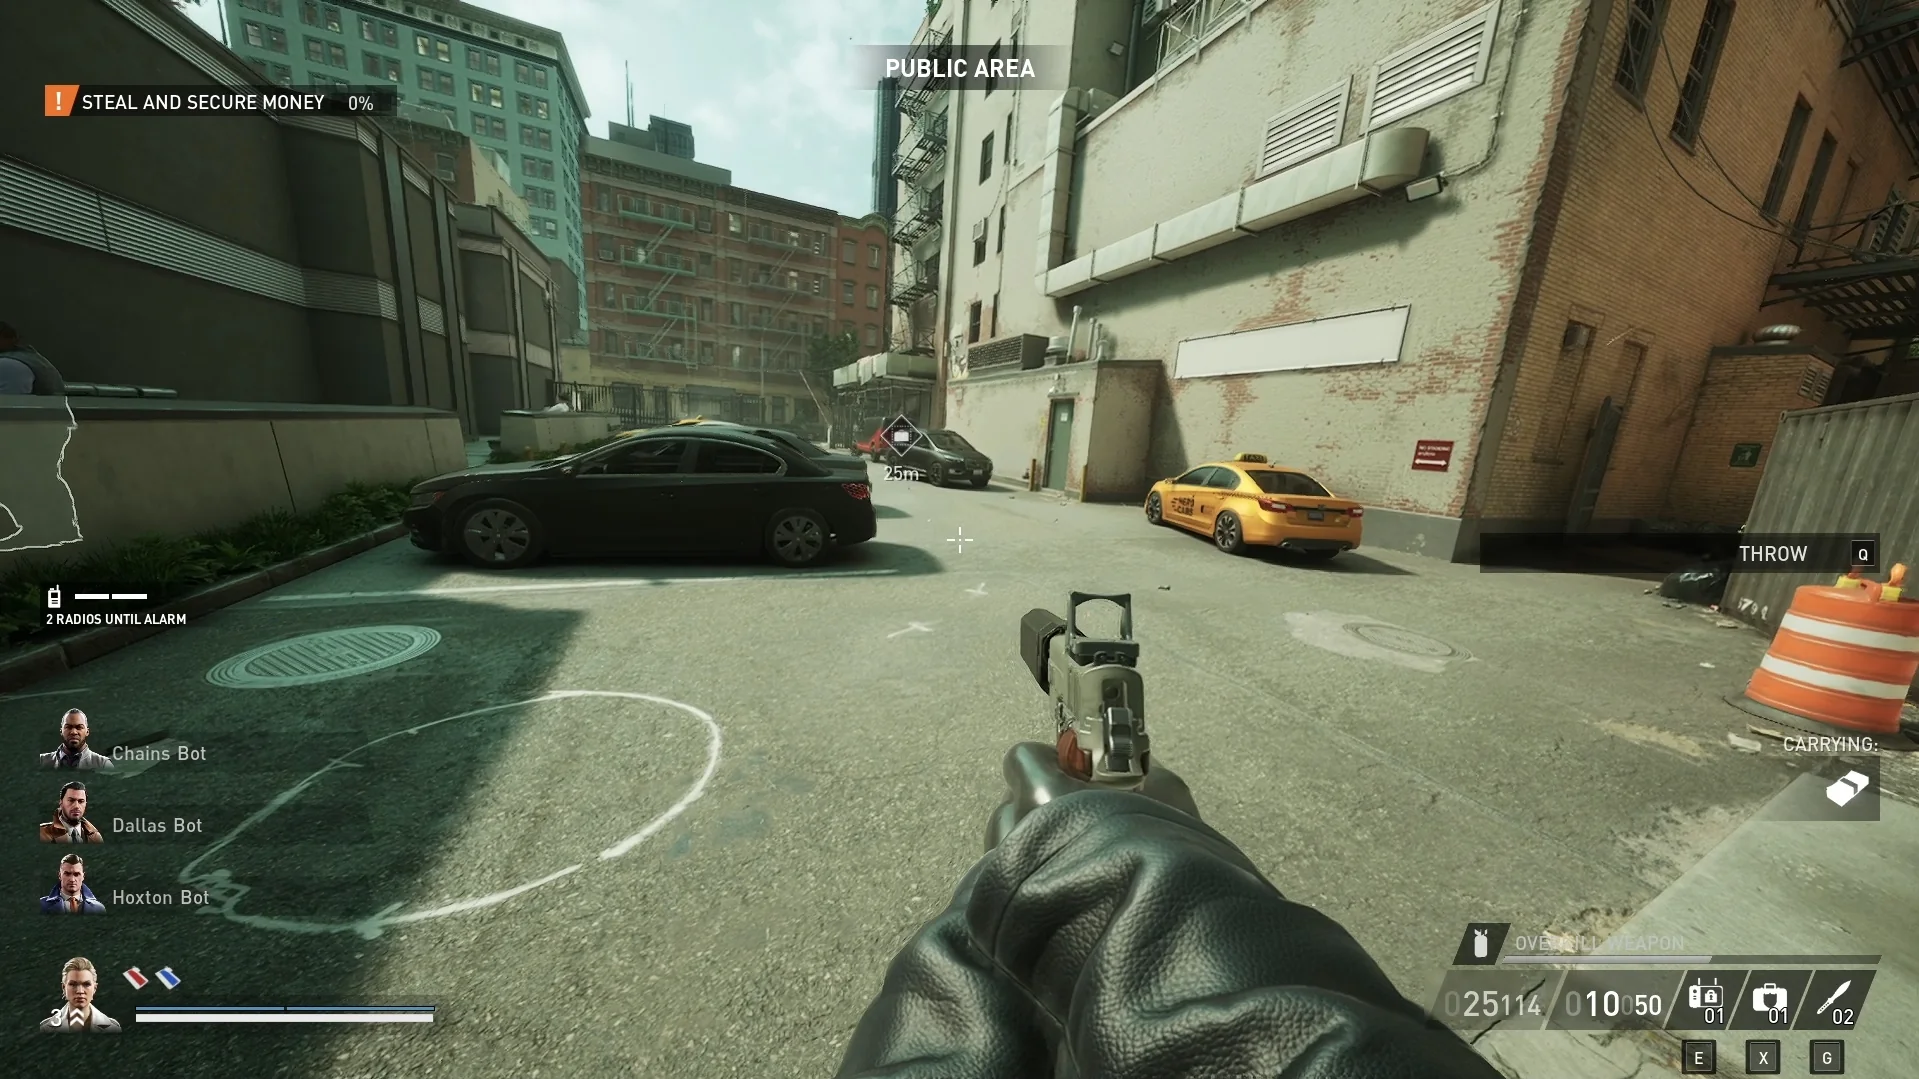
Once you’re finished converting the stacks of cash to bags, start moving them toward the escape van. Following the marker will lead you down the street or through an alleyway to another large open area. I’m not 100% sure how the developer scripted this part, but I like to get here quickly to trigger the next step. To hopefully make the escape van arrive sooner.
7. Clear the area.
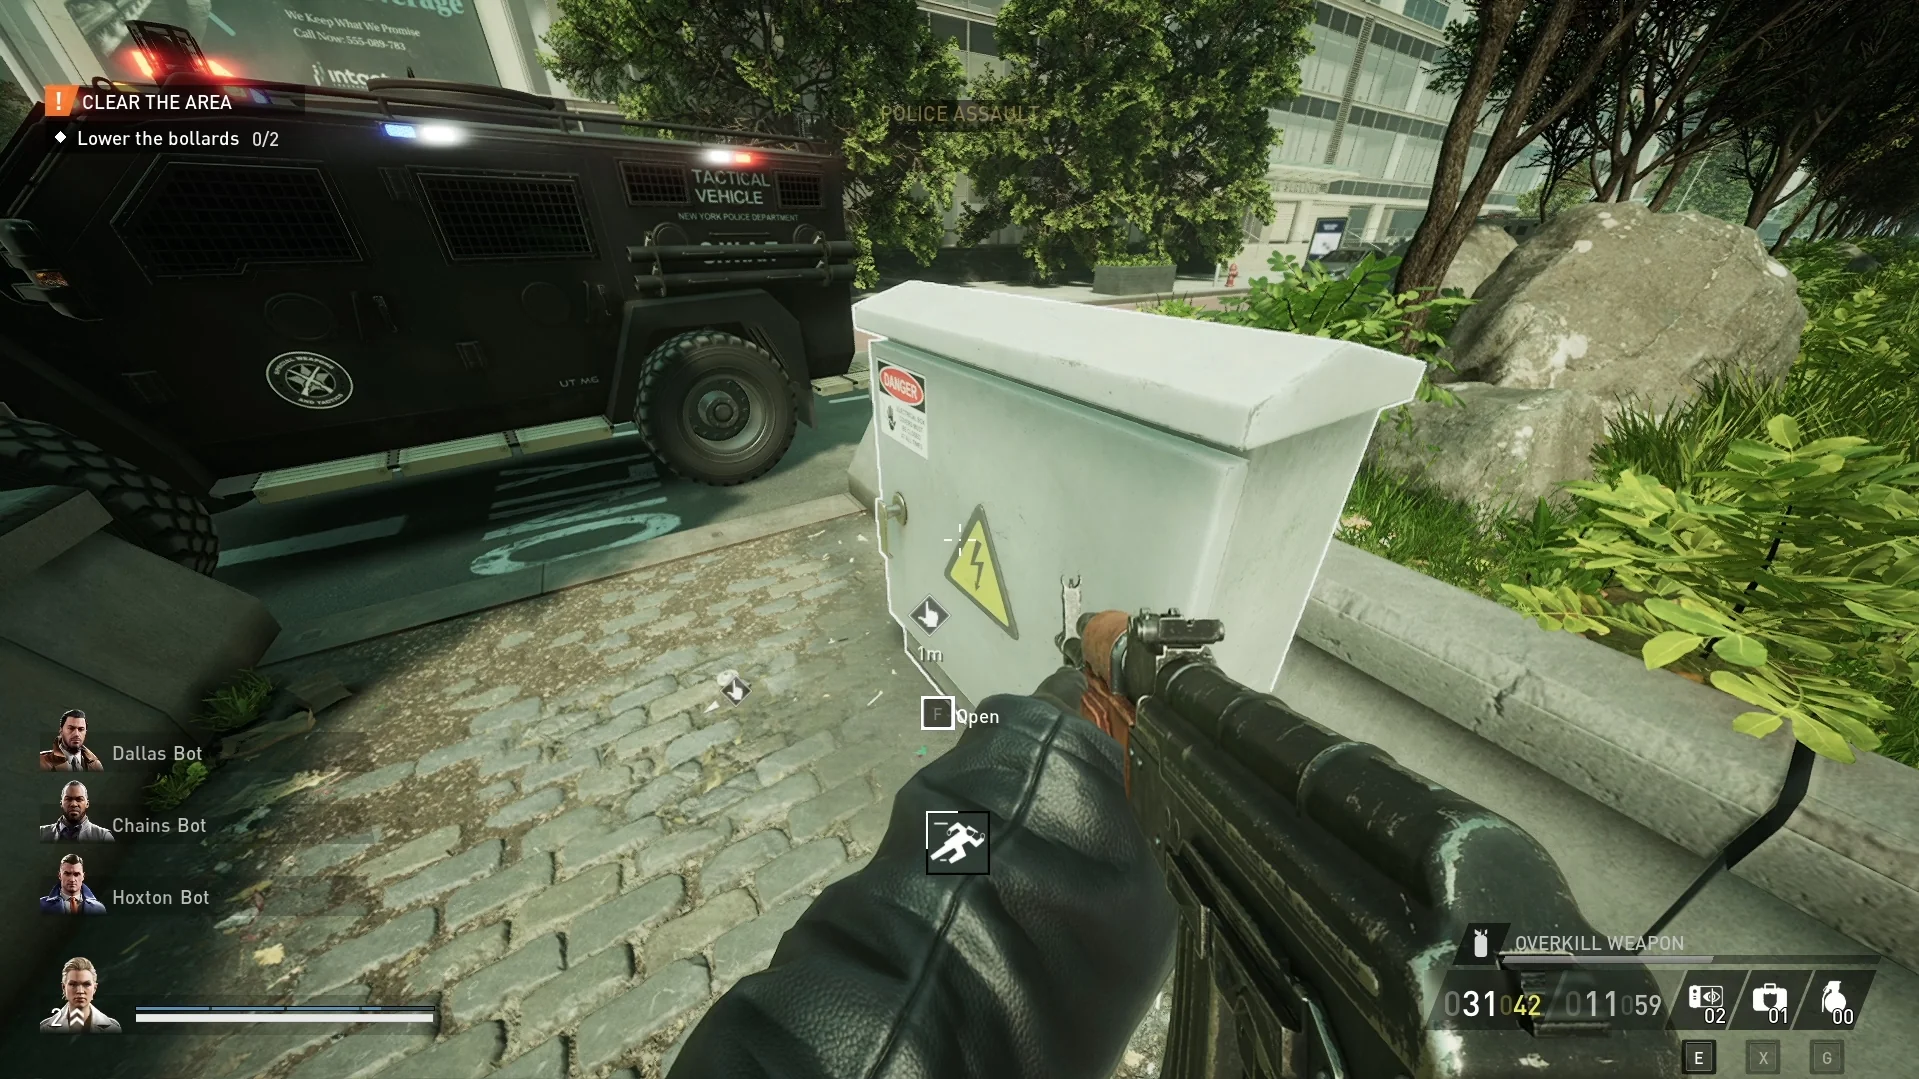
7.1. It’s time to lower the bollards blocking the escape van from getting close. Depending on the difficulty, the amount of bollards you have to disable will vary. For example, playing on Normal will only have two, while Hard can have four. In order to disable them, look for large white electrical boxes in the new area. They can be along the road median, near the subway stairs, and some scaffolding.
7.2. The step to hold out until the getaway arrives is primarily to survive while you wait. Chances are you’ll still be relaying bags from the bank over to this area, however. It’s worth mentioning that the escape van can appear on the far left side or right side of the road. But, it’s important to get the bags in the area so you don’t have to worry about police taking them at the bank.
8. Steal and secure money.
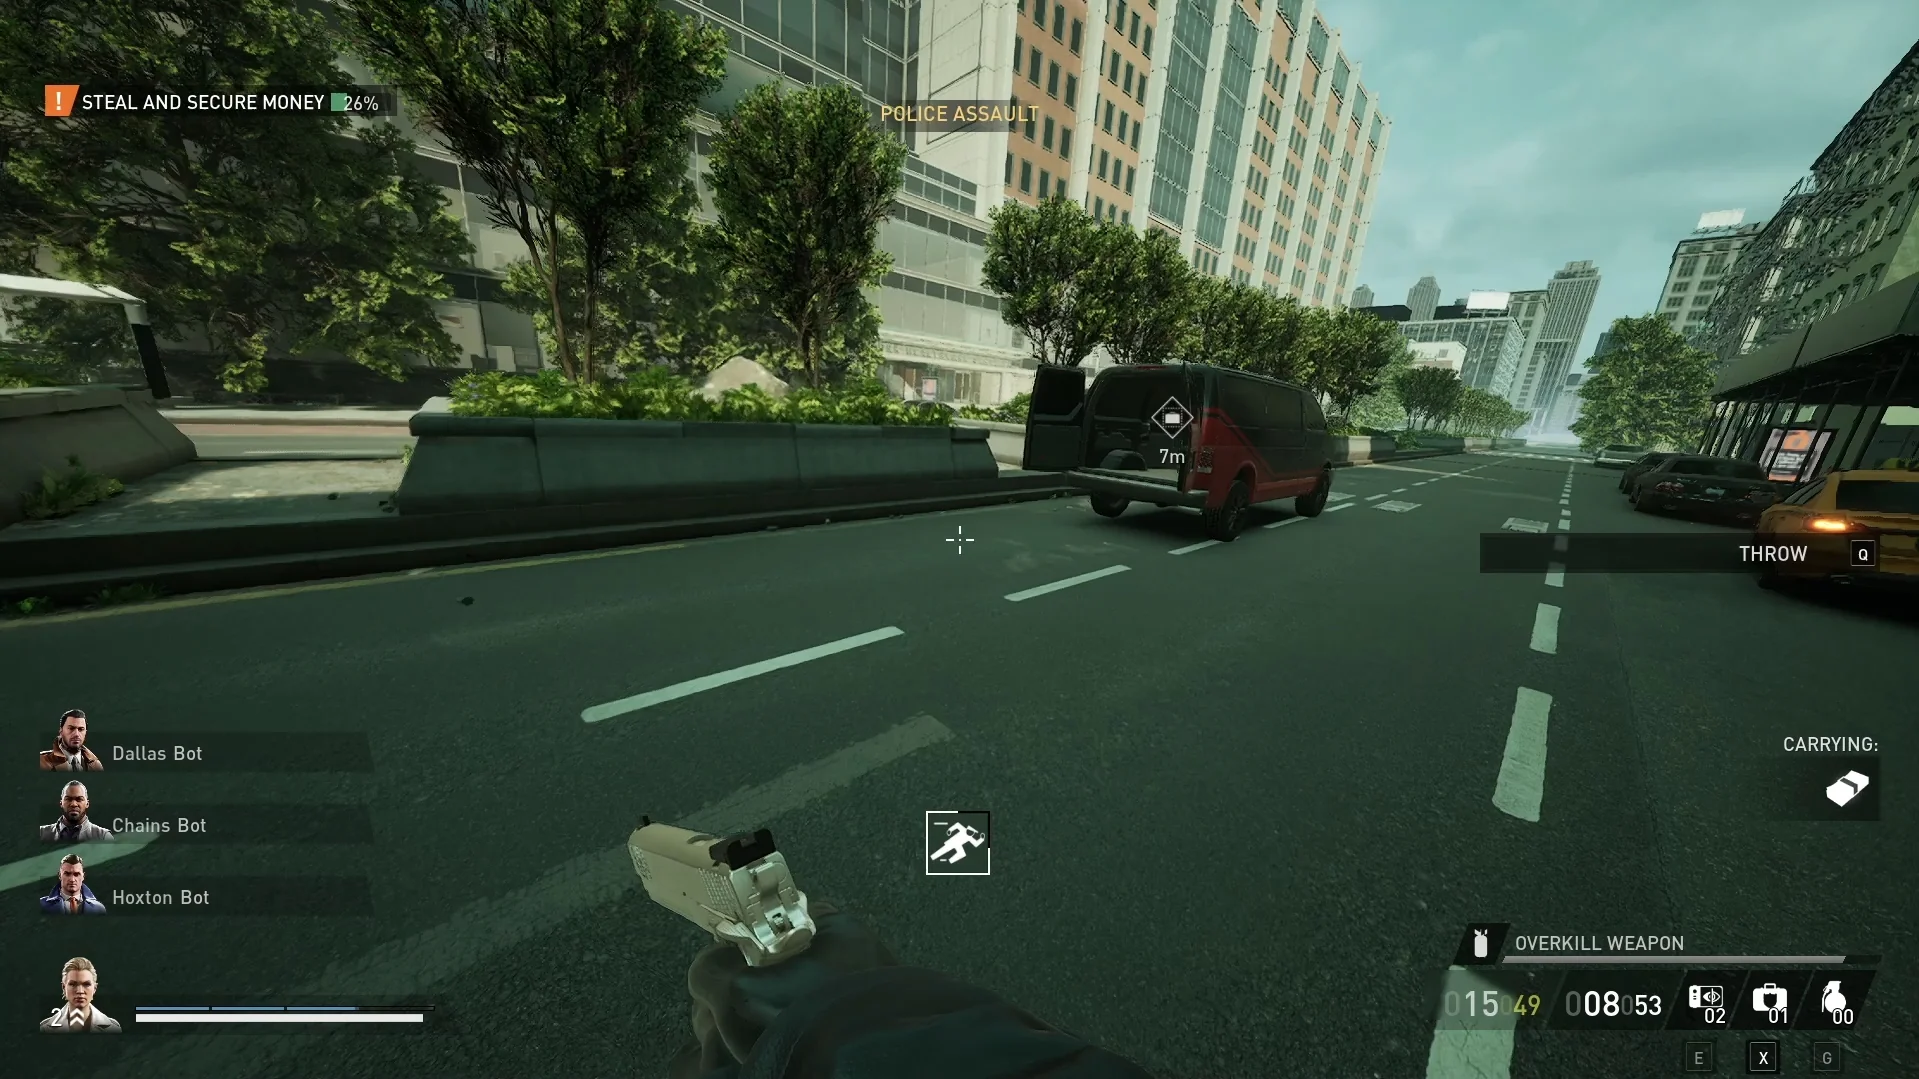
Once the escape van arrives you can start stashing bags in it to progress the objective. You’ll see a percentage update of your progress at the top left for each bag added. Fortunately, inked money bags will also count toward this goal. Regardless, depending on how your heist is going, you can either stash every bag in the van or escape once you reach the minimum.
9. Escape
9.1. As mentioned in the previous step, it’s optional to secure all loot/bags. It’s worth reiterating here again that there are two money bags hidden in the deposit boxes. So if you finish your No Rest for the Wicked heist and are missing two, this is where they likely are.
No Rest For the Wicked Stealth Walkthrough
Completing No Rest for the Wicked stealthily can be tough when you’re first learning the heist. And on top of that, there is some RNG to where cameras are, certain rooms you’ll need to find, and more. However, if you need to vote to restart the heist, the layout will stay the same as long as you don’t restart from the main menu. Similar to the previous section, here are the steps with more info below.
- Enter the bank.
- Get past the security gate.
- Turn off power to the gate.
- Find the power room.
- Find a red keycard.
- Disable the security system.
- Open the gate.
- Flip the right switches.
- Open the vault.
- Grab an executive.
- Shove hostage into eye-scanner.
- Unlock the manager’s computer.
- Open the vault: 4251, 0911, 7513, 6553 (codes will vary each heist)
- Loot the vault.
- Disarm the dye packs 0/8.
- Optional: Find the executive’s deposit box.
- Steal and secure money.
- Escape
- Optional: Secure all loot.
1. Enter the bank.
The first No Rest For the Wicked objective is the same regardless of whether you’re going loud or stealthily. So there isn’t too much to this step aside from, entering the bank. Similar to my suggestion in the loud walkthrough, I recommend closing the shutters on the lobby windows. You can do this by interacting with each white switch along the lobby walls inside.
While you may not need to do this depending on where the escape van is, it’s worth it either way. This is so you can prevent civilians and guards in the lobby from peeking outside when you’re transferring the money bags.
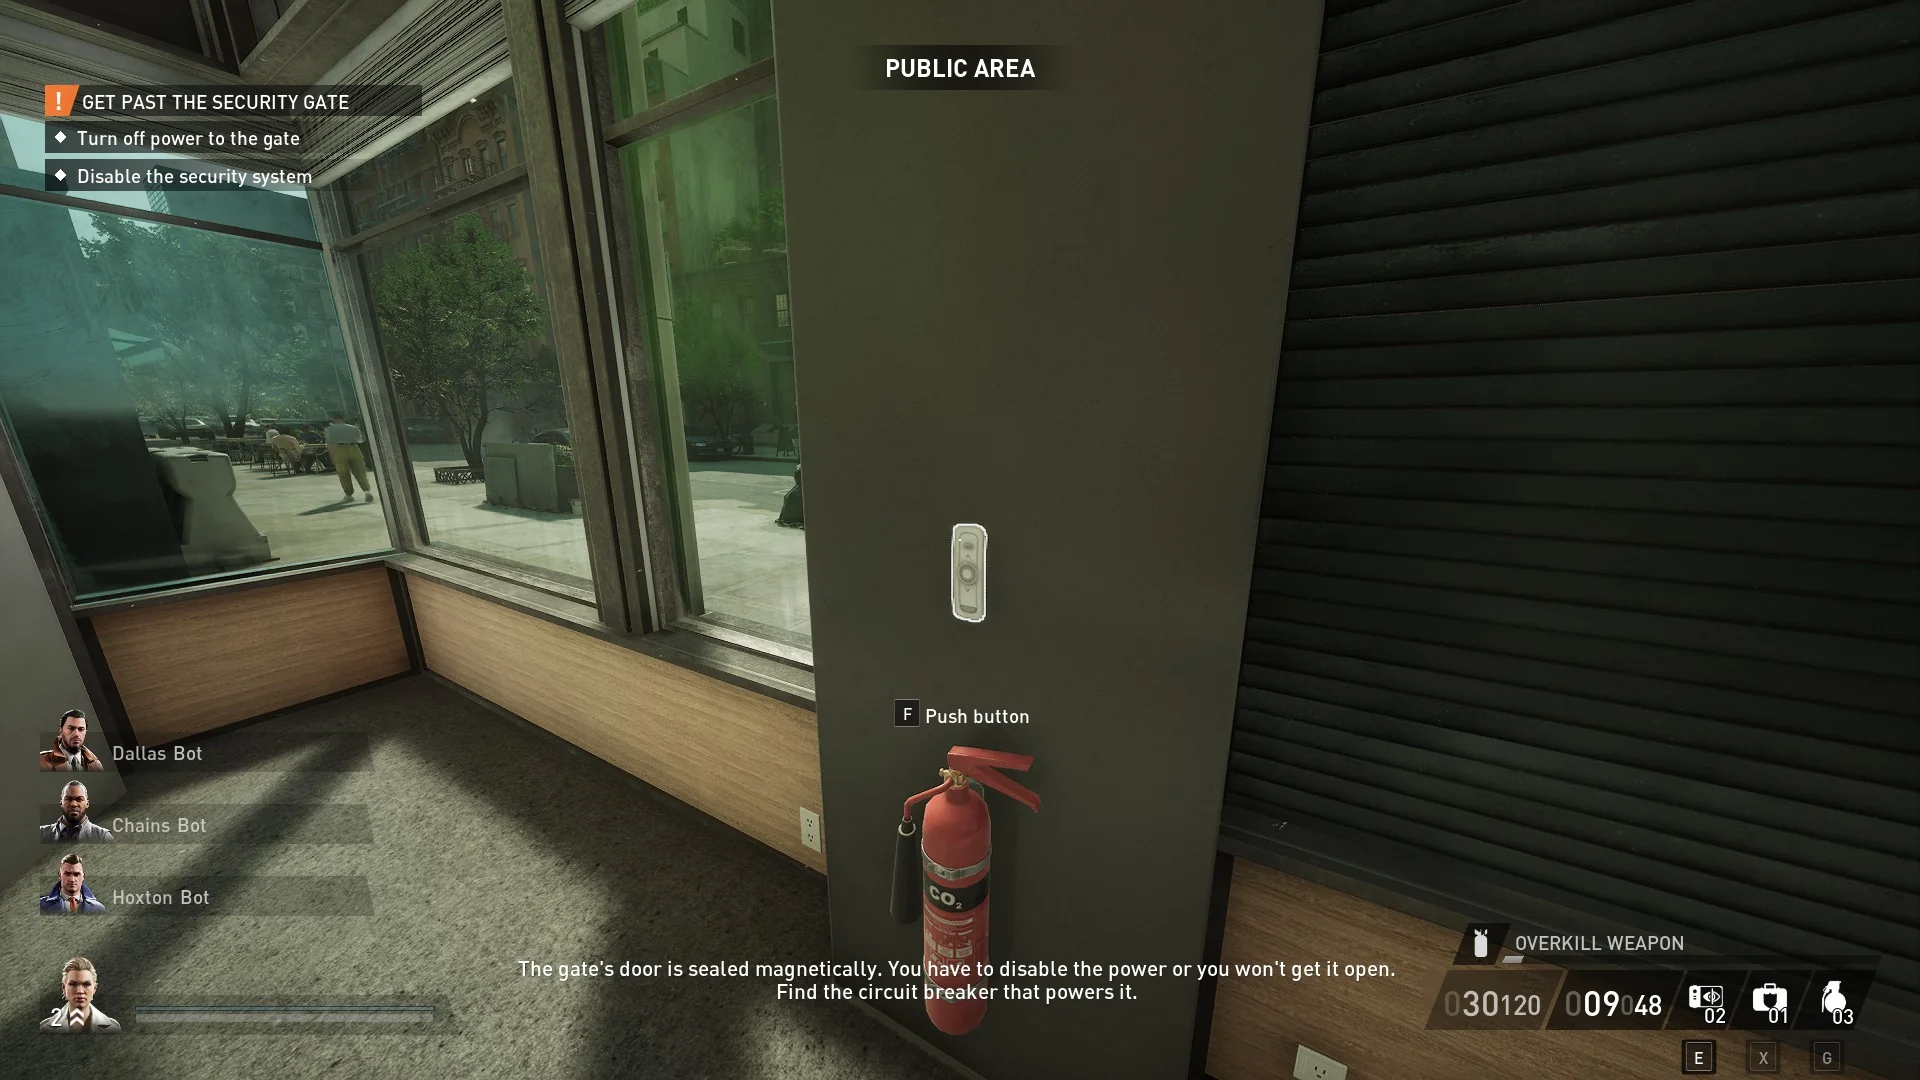
2. Get past the security gate.
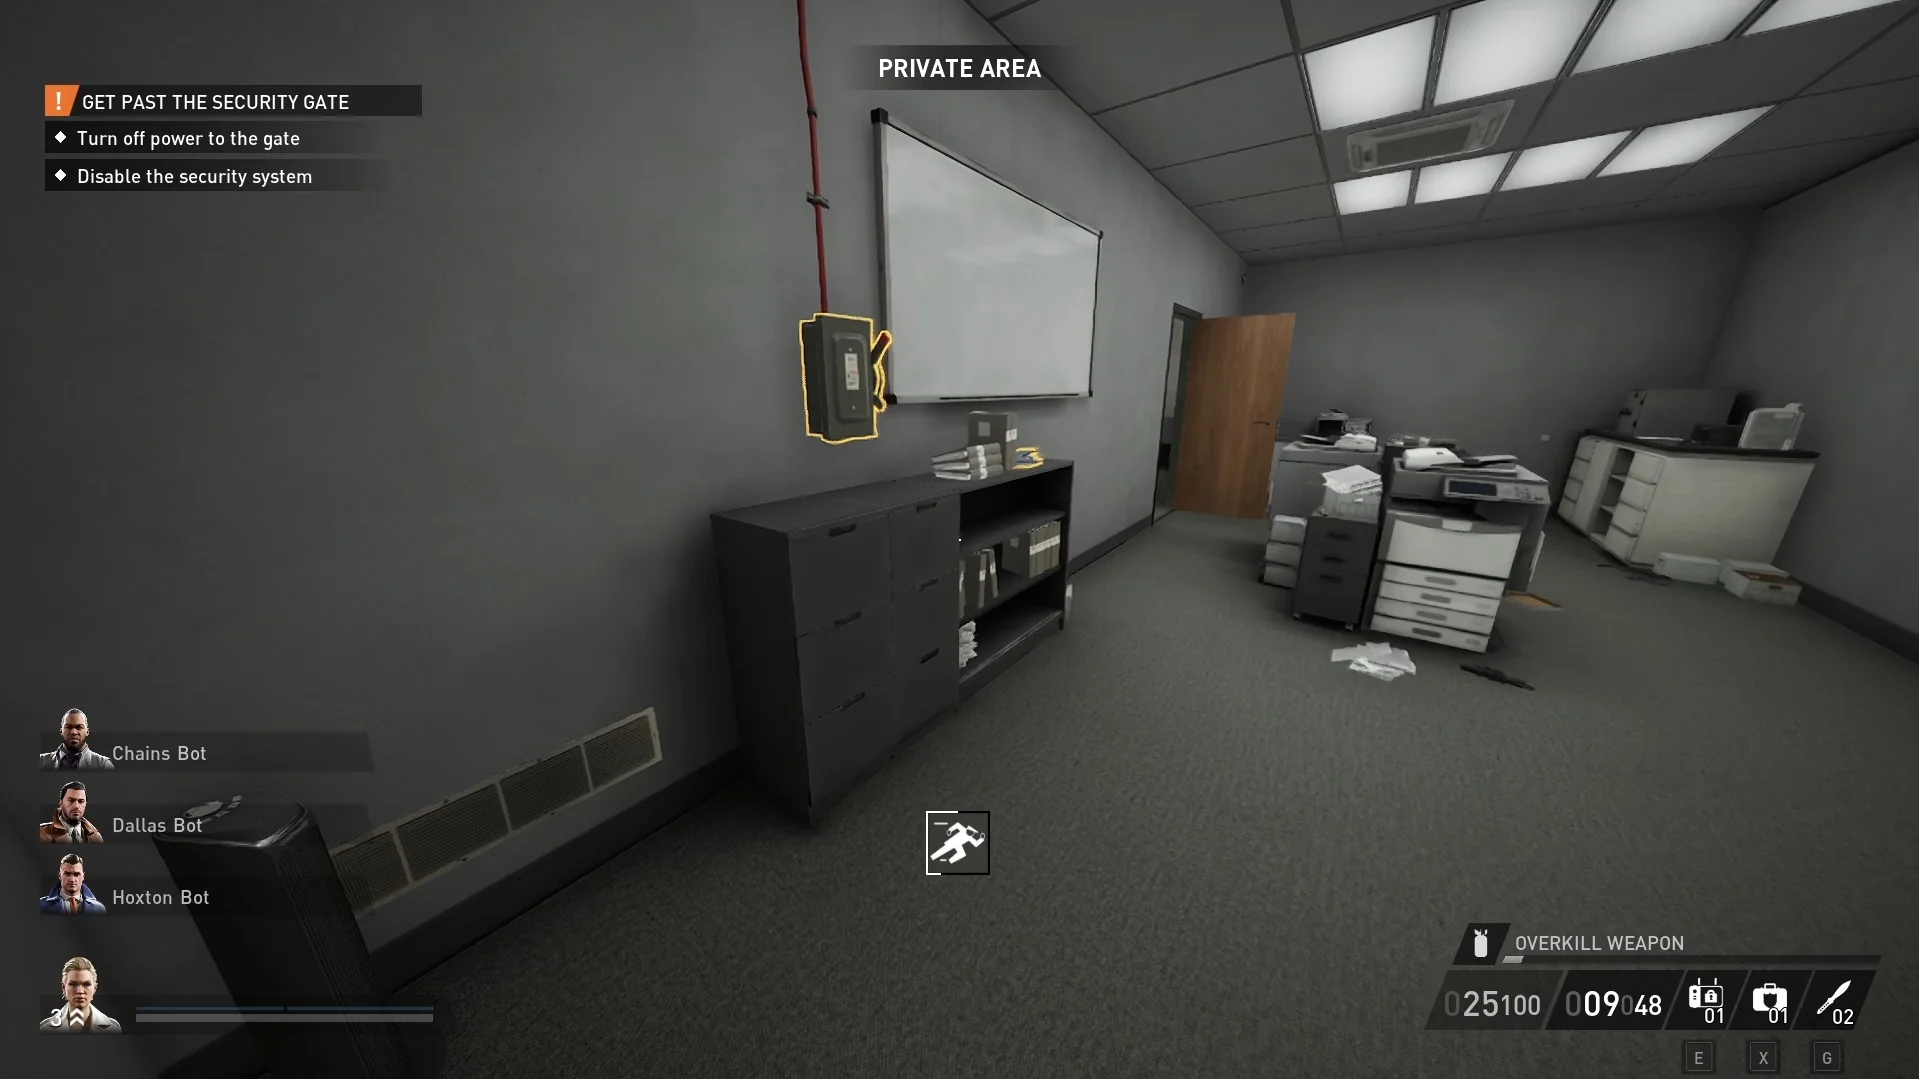
2.1. Your first actual goal will be turning off power to the gate. This can appear in at least two different areas that I know of. First, the IT room on the first floor. This is the better one since you can interact with it without being seen more easily. Second, the copier/printer room on the second floor. Either way, you can follow red cables along the ceiling to the power box.
If you’re having trouble finding the red cables, they originate at the security gate before reaching the vault. Just make sure when you interact with the power box that nobody is observing you. Fortunately, they’ll only say something if you complete the action. Or if it’s a guard, they’ll obviously come over since you’re in a Private Area.
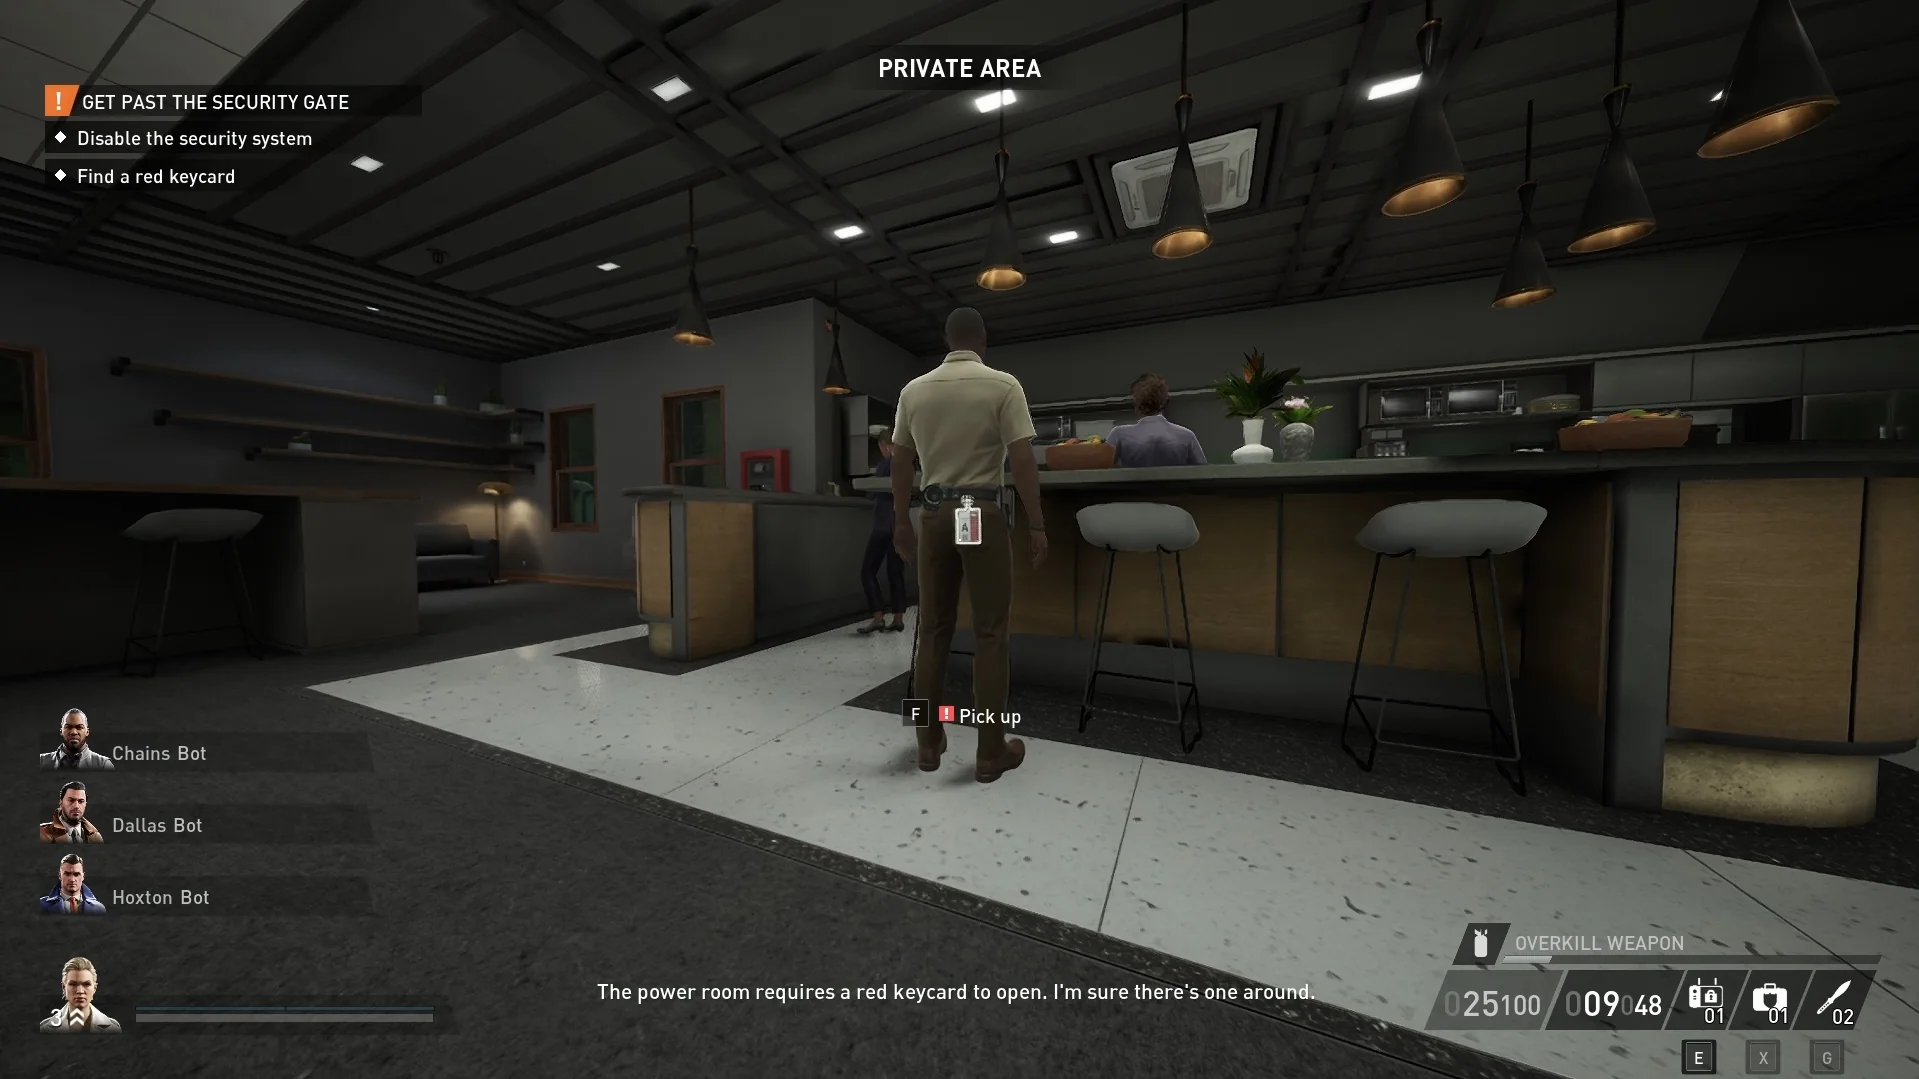
2.2. Once you’ve disabled the gate’s power, I recommend finding the power room. You’ll need to get a red keycard from one of the patrolling guards inside the bank. I’ve noticed the guards carrying keycards are usually the first-floor one patrolling near the vault gate or the second-floor one on patrol.
As mentioned in our Best Payday 3 Tips and Tricks guide, there’s a fun trick for snatching keycards. You can have a guard spot you in a Private Area and while they’re escorting you to a Public Area, grab the keycard. As long as you’re in their circle, you can take it if nobody sees you do it.
Once you have a red keycard, you’ll need to open the power room. Fortunately, there aren’t any guards in here so it’s a safe room for the moment. The location can vary in No Rest For the Wicked but I’ve seen it on the second floor in two different spots or on the roof.
2.3. I already went over getting the red keycard in the previous step, so you may have it by now. Even though you can do some of these steps out of order.
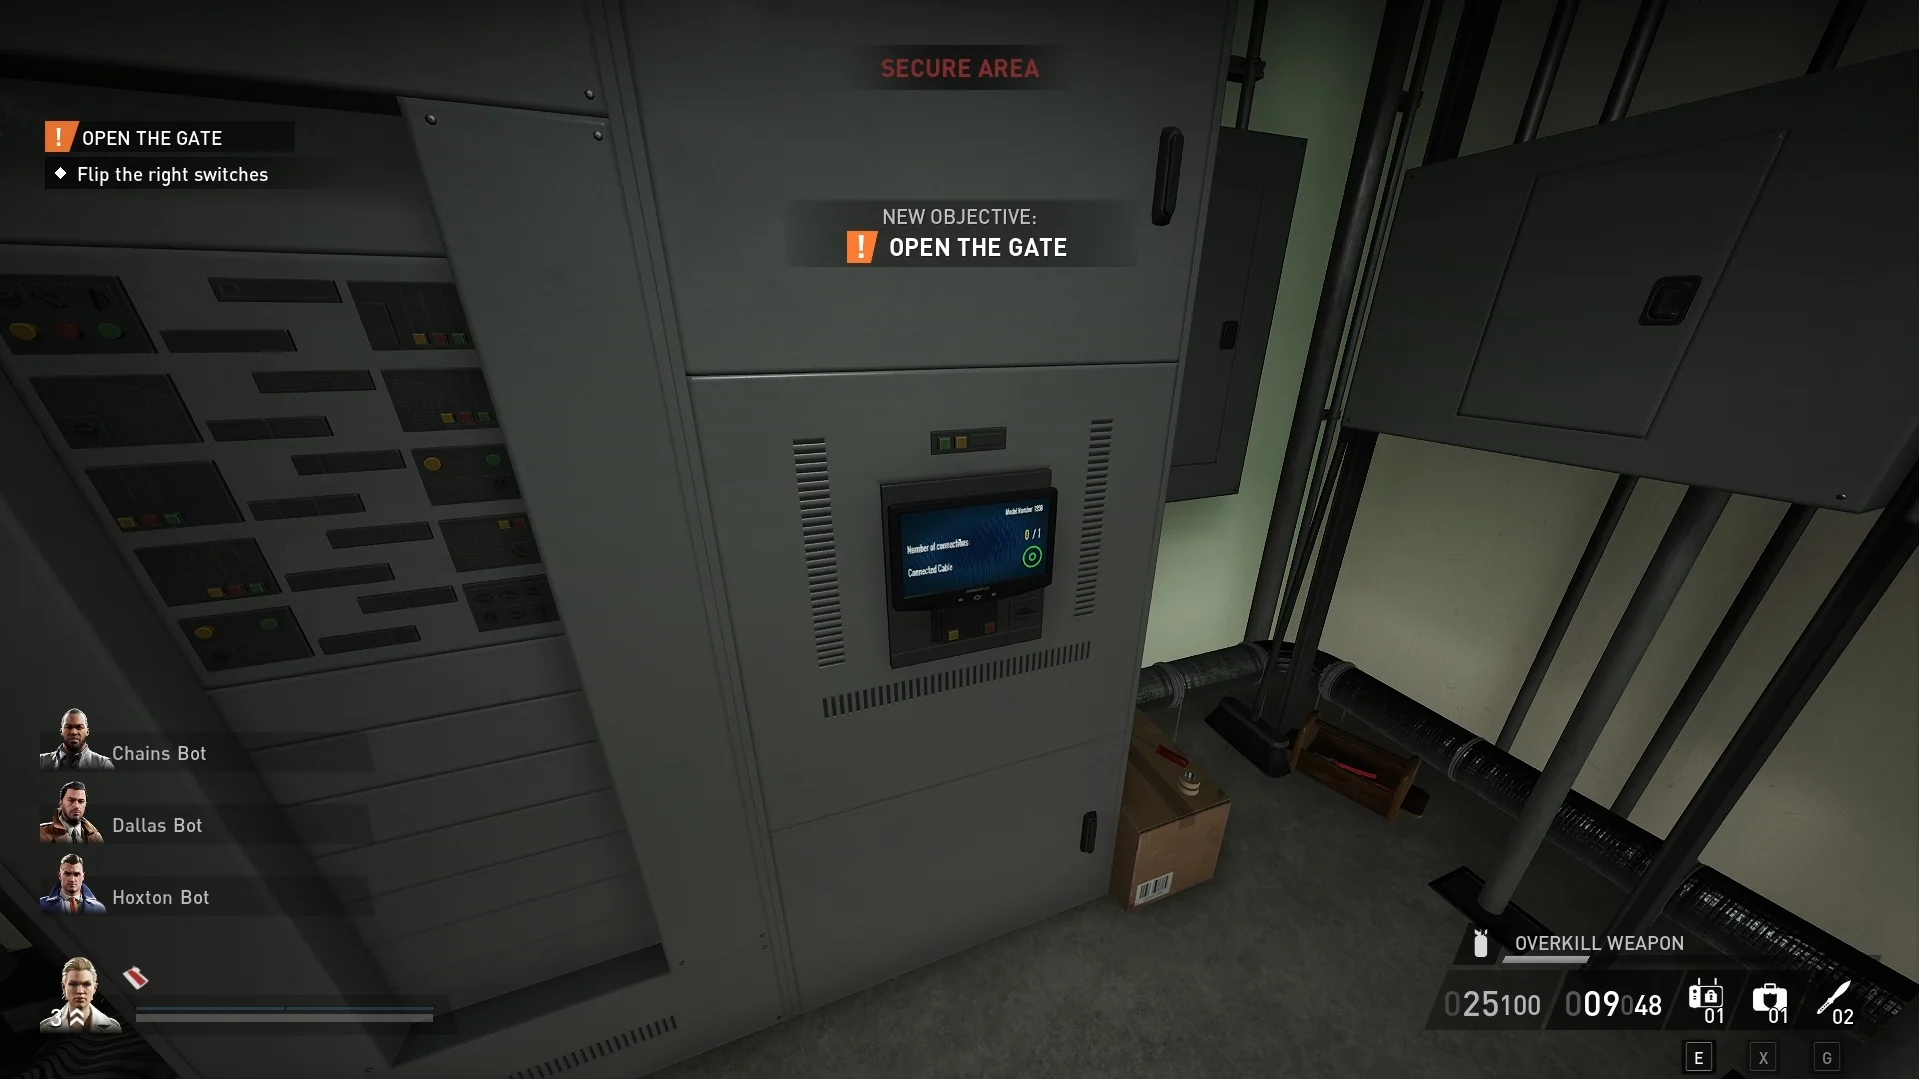
2.4. Now that you’re inside the power room, I recommend closing the door behind you. Then, hack the computer in here to disable the security system. As long as you turn off the gate’s power in step 2.1, you can then interact with a console here.
This step is important because it’ll tell you the color of the switch to flip in the next objective. If you haven’t disabled the gate’s power yet, you’ll need to do that before you can see the right switch color.
3. Open the gate.
3.1. Up until this point if everything is going well, you shouldn’t have had to use your mask. However, if you’re playing with other people, it can be beneficial to have someone take out the guard in the security room. This is so you can disable the cameras without having to shoot them. Even though patrolling guards are the only people that will notice a broken camera.
The next step is to return to the first floor and figure out how we can interact with the switches by the vault gate. Depending on camera placement, you may need to destroy them. But, you’ll need to do it without drawing too much attraction. Which is why I recommend taking out a guard and/or destroying a camera simultaneously.
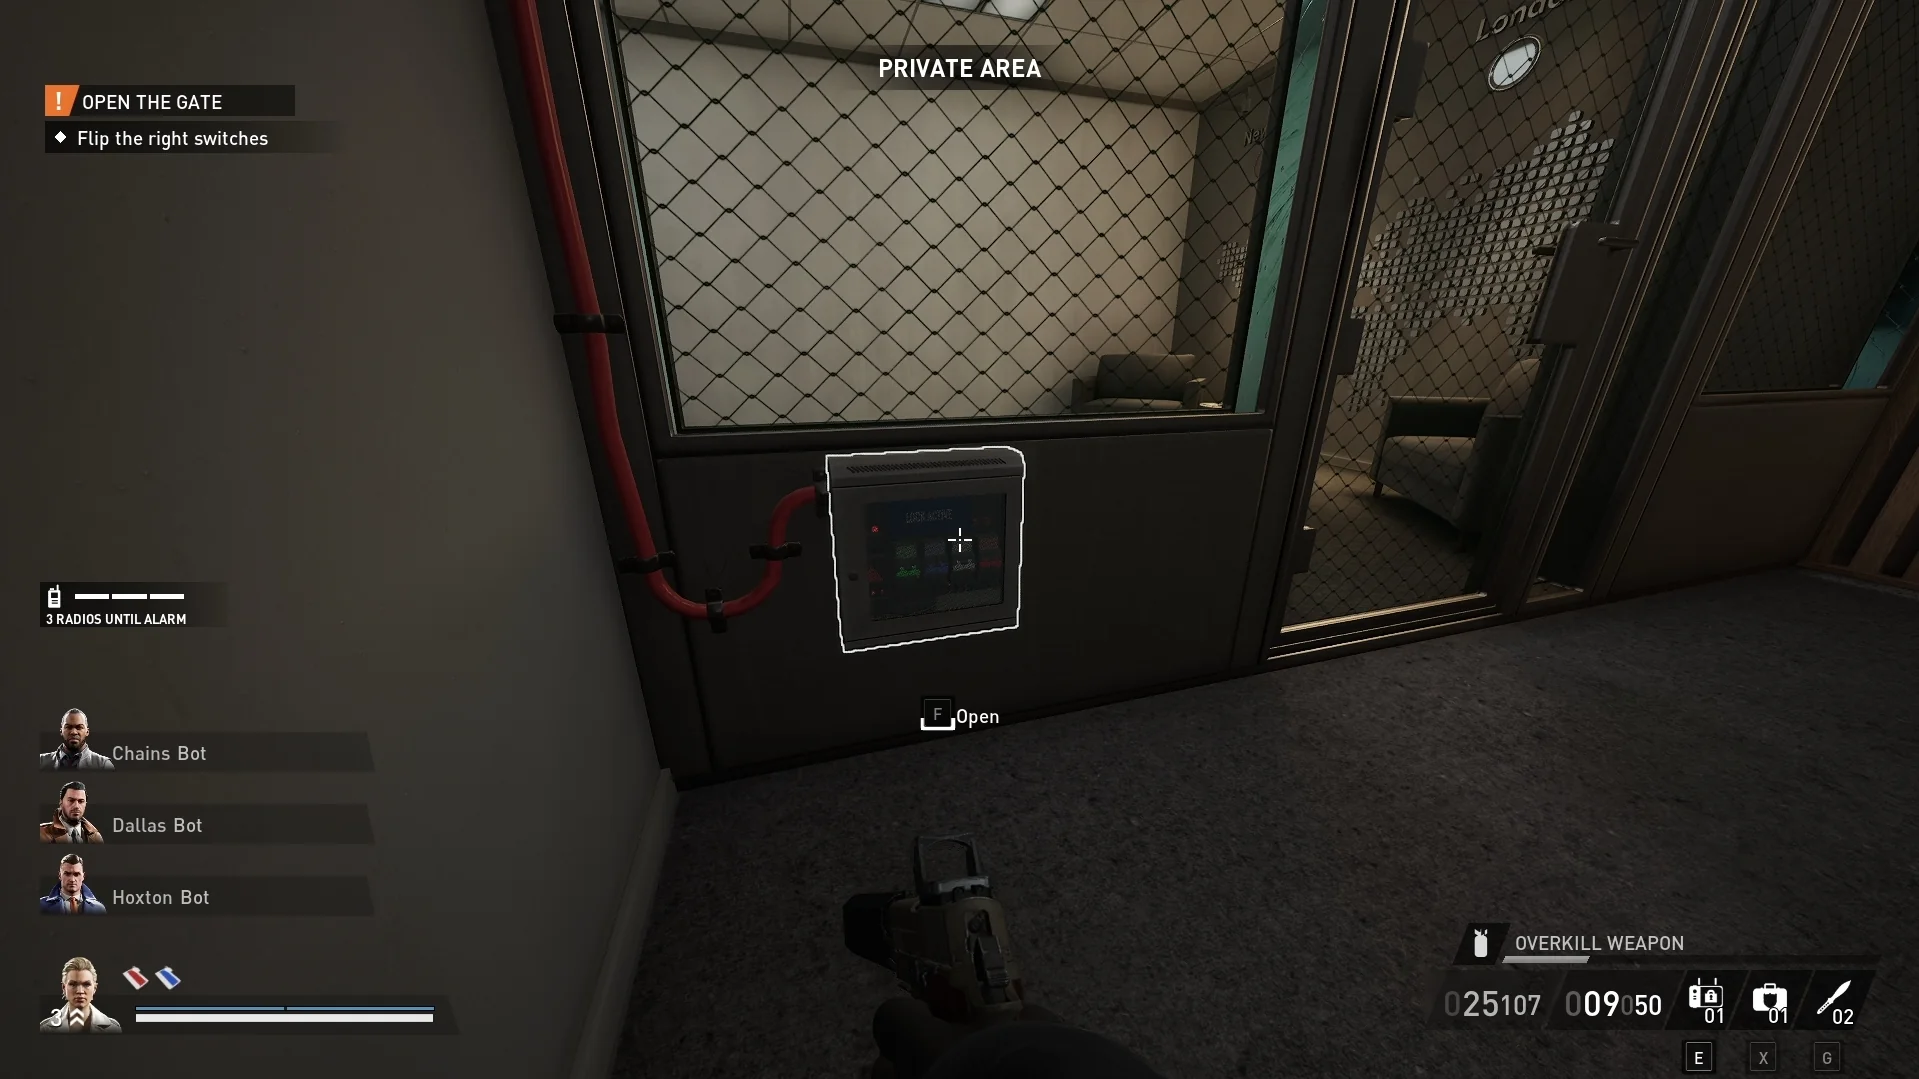
My video at the top of this guide section shows how I dealt with a guard near the vault gate. First, I got into a blind spot and masked up while their back was turned. Since there weren’t any civilians watching at the time, it was easy to do a stealth takedown. Afterward, I tossed him into the nearby room where in my run, only one person would wander into.
At this point, you’ll mainly have to worry about wandering civilians and any cameras near the vault that can see you. However, if there aren’t any guards patrolling nearby, you can destroy the cameras. Finally, you can interact with the switch panel to the bottom left of the vault gate. Just make sure you flip the right switch color.
4. Open the vault.
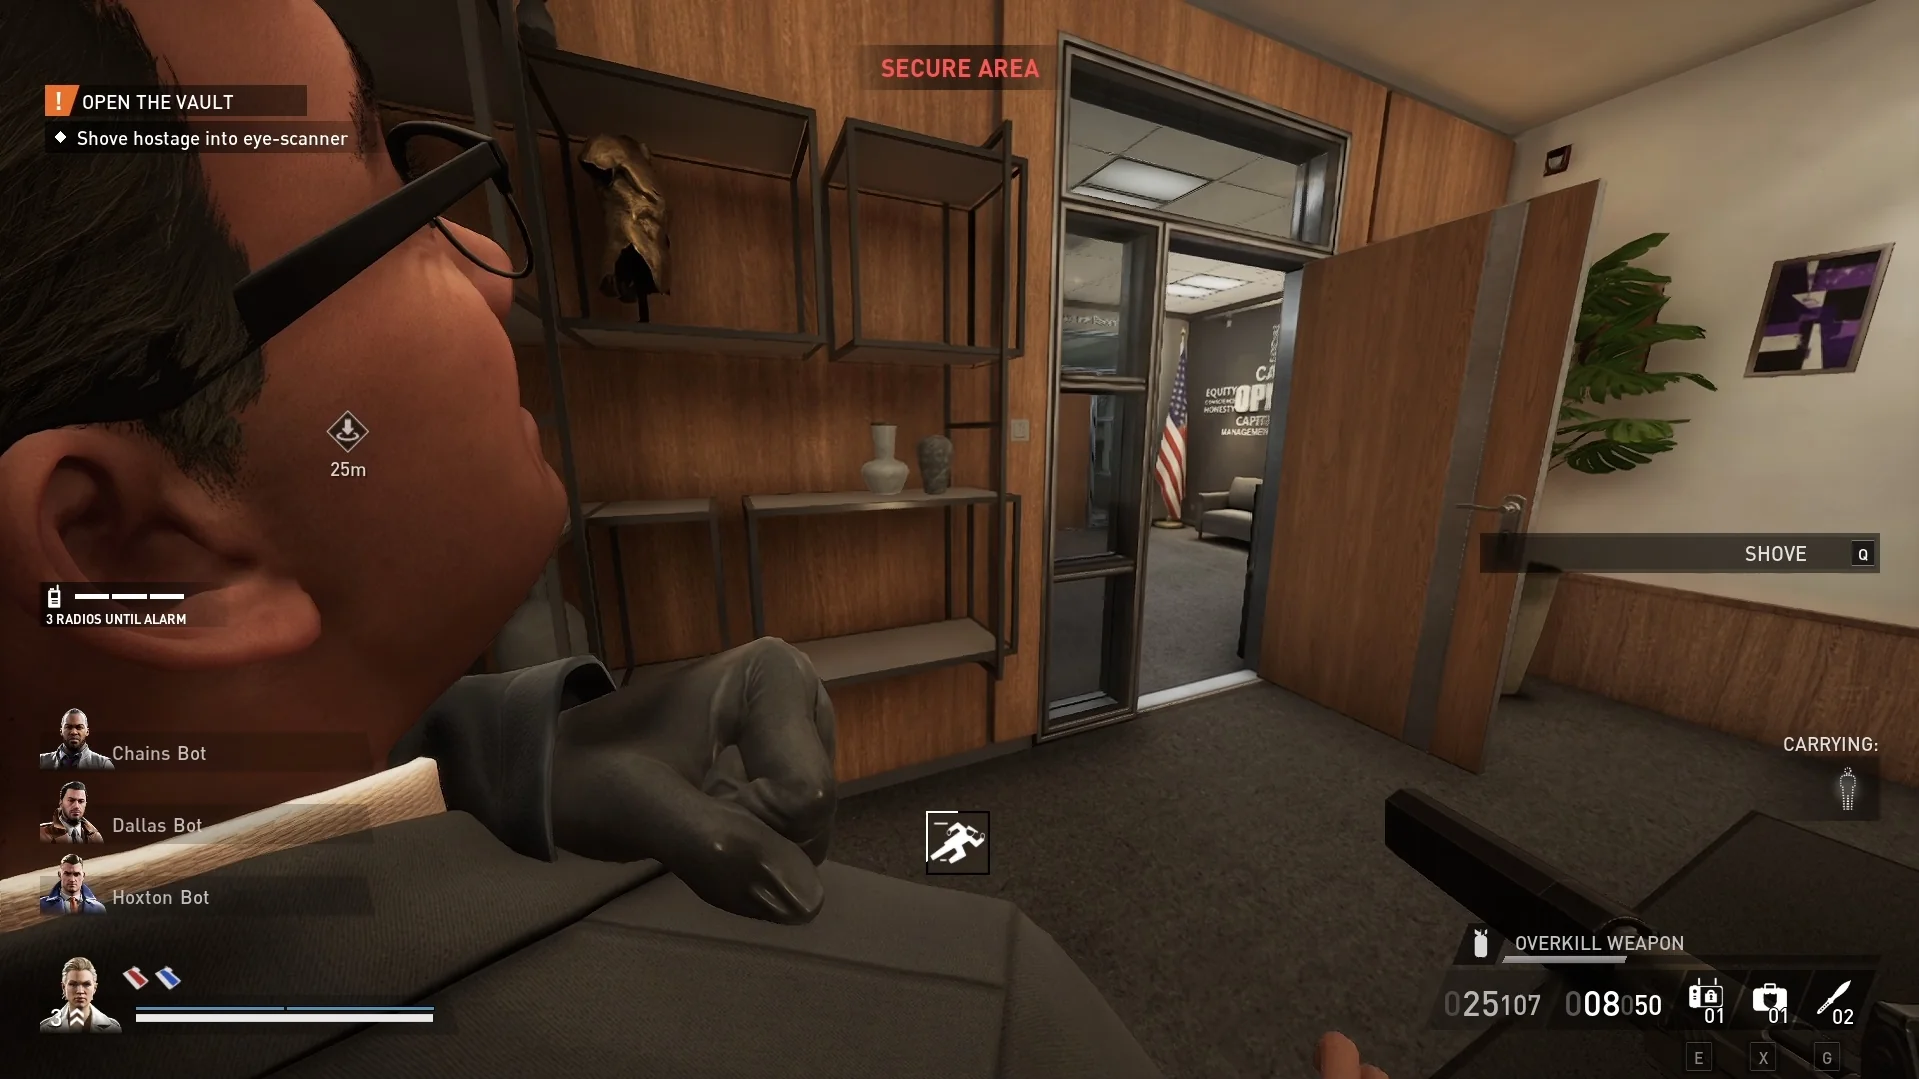
4.1. Between this step and the next one, this is another risky time where it’s easy to get caught. You’ll need to grab an executive and bring them to the vault once the gate is open. However, you’ll need to find an executive. Fortunately, the game highlights an executive when you’re near them.
I usually aim to get the manager on the first floor in their office. You can find it across from the conference room, however, it may be locked. The main risk here is grabbing them without a guard in the alley seeing you do it through the window. So you may want to sneak into this room and peek through the windows before grabbing the manager.
4.2. Now we need to get the manager over to the vault’s eye-scanner. Before we can walk the manager over, it’s important to have a clear path. This is why it’s worth disabling or destroying any cameras along the way. As well as tying up civilians in the IT room.
Fortunately, the conference room has never been an issue for me while carrying the manager past. Even though they may get suspicious briefly. I try to avoid tying up civilians in that room since the guard outside may see them. But, there’s always some RNG that could still mess things up.
Once you get the manager past the vault gate, you’ll need to shove them at the eye-scanner. Just make sure a guard from the lobby doesn’t see through the other vault gate. This mostly relies on timing since you don’t want to have to clear the lobby.
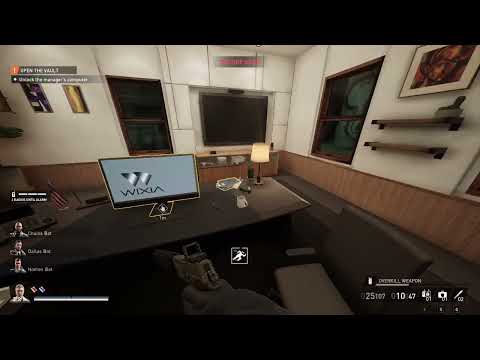
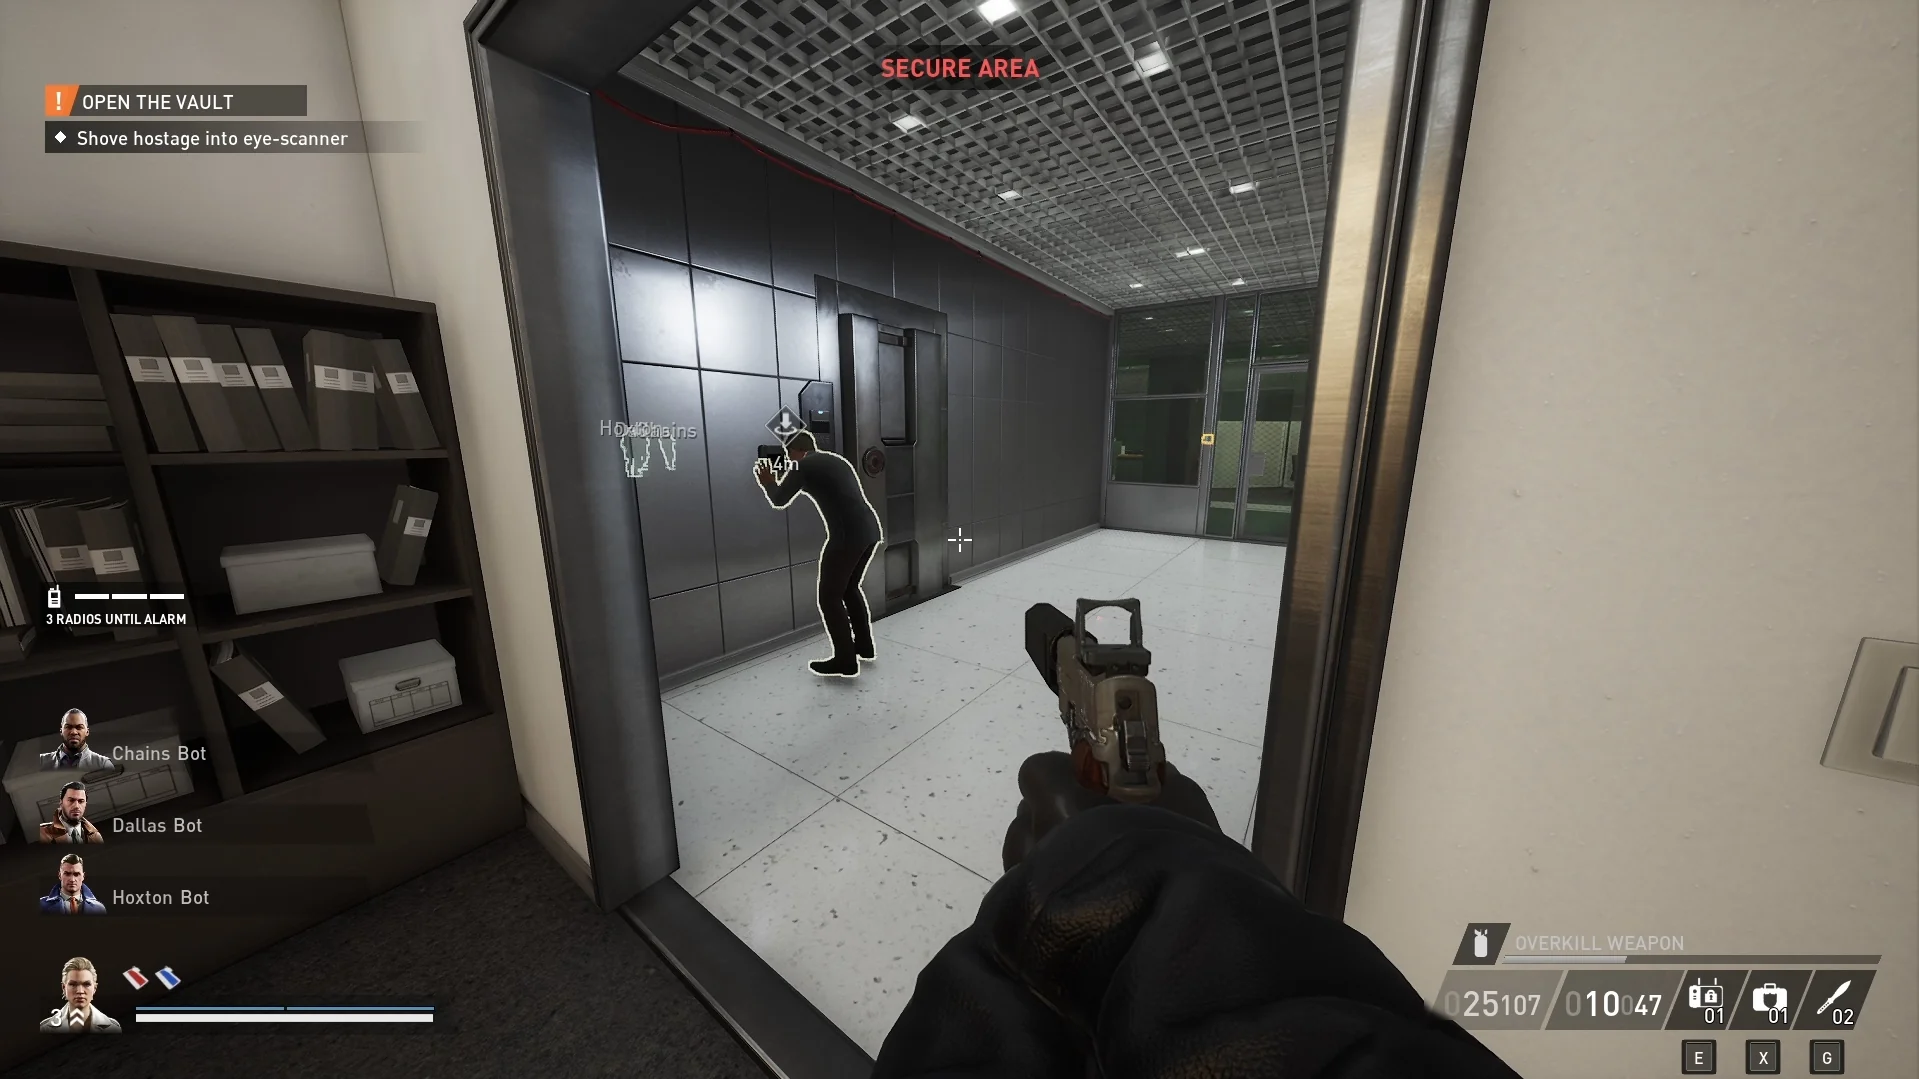
4.3. After shoving the manager at the eye-scanner, I like to stash them near the side entrance room. This is the small room to the right of the vault gate where I put the guard. Then, you’ll need to unlock the manager’s computer. This can be in their office or the conference room. If you’re lucky, it’s in their office.
If it’s in the conference room, you’ll need to carefully shout all the civilians down. You may have to move them away from the windows or take out the guard in the alley. But, if you do so, make sure you don’t break the window. The noise can alert other nearby guards.
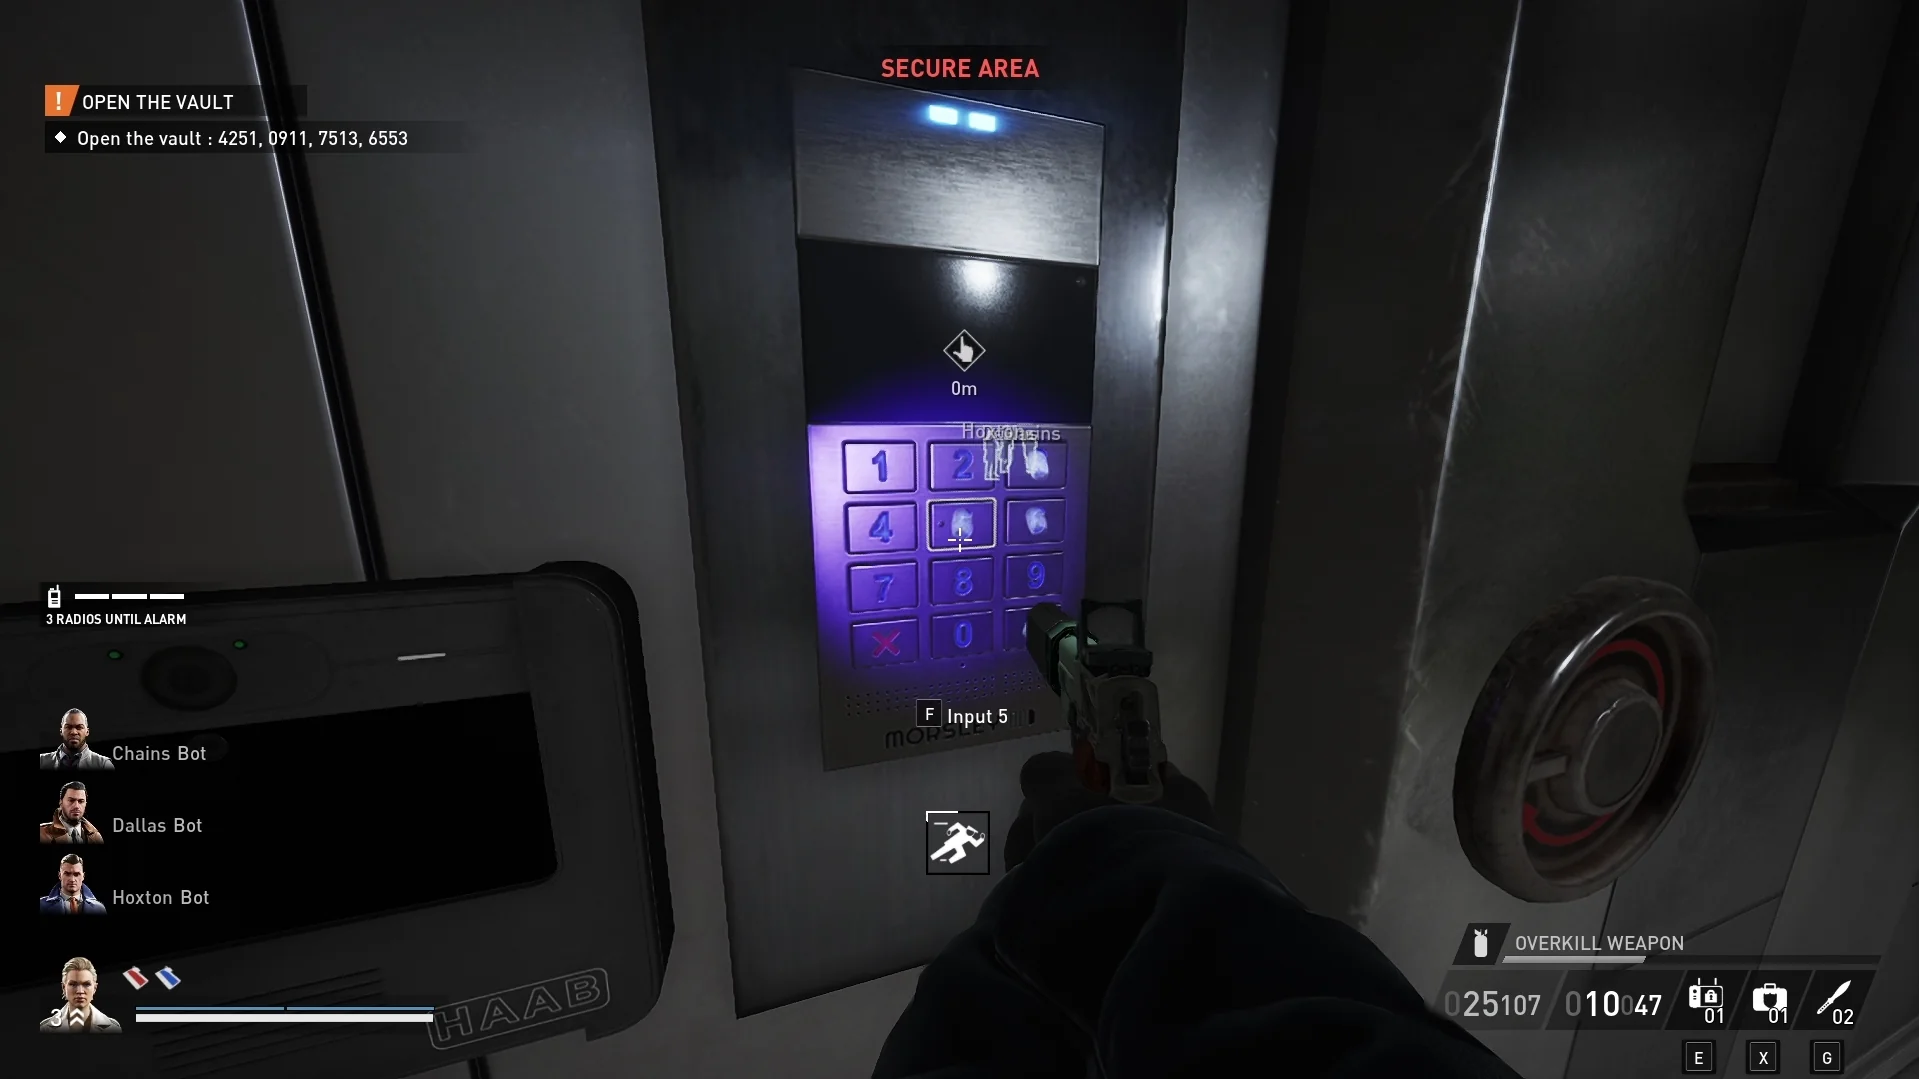
Once you interact with the manager’s computer twice, you’ll get four potential vault codes. The trick to figuring out the vault code is by looking closely at the vault keypad. You’ll be able to see the most frequently used numbers via your UV light.
Here’s an example of how it went down in my heist which you can also see in the stealth run video above. The laptop gave me the codes: 4251, 0911, 7513, 6553. Then, by looking at the keypad I could see fingerprints on 3, 5, 6, and the confirm key. So that tells me it has to be a code with only those three numbers. Which leads us to 6553.
4.4. Open the vault using the right code and press the green check to enter it. If you type in the wrong code, you’ll have to wait a moment before trying again. While it’s okay to take longer, there is the risk that the lobby guard notices you.
5. Loot the vault.
5.1. Once you’re inside the vault you’ll need to get inside the inner room. This is where several stacks of cash are waiting with dye packs to disarm. If you’re playing alone, you won’t be able to disarm all of them. As mentioned in the loud section, I’ve done six at most, but even five is difficult.
6. Optional: Find the executive’s deposit box.
If you haven’t already found the executive’s deposit box, you can either pick all of them or check more folders. I haven’t been able to confirm if there are any rewards for finding the documents inside their deposit box. Even though I tend to pick every box to get the two extra money bags.
7. Steal and secure money.
The tough part is moving each money bag quietly to wherever the escape van is. In my experience, the van on No Rest For the Wicked can appear in two spots while playing stealthily. It’s either in the parking lot or to the right of the bank when looking at it. I prefer the parking lot since there aren’t civilians wandering around. But the other exit has an alley leading up to the van.
Your best bet here is taking out the guard in the parking lot and likely ignoring civilians nearby. However, depending on your RNG, you may need to shout the civilians down. As I previously mentioned, this is where having the window shutters closed helps.
8. Escape.
Once you’ve delivered the minimum amount of loot you can escape via the van. But, there’s always the optional goal of trying to secure all the loot as well.
That marks the end of this long in-depth guide on Payday 3’s No Rest For the Wicked heist. If you’d like to see more heist guides, be sure to let us know in the comments. And if you’re looking for more tips, check out our Best Payday 3 Tips and Tricks guide.


Jeff is a journalist with over 10 years of experience writing, streaming, and making content about video games. With an associate degree in journalism, he’s a sucker for RPGs, survival games, roguelikes, and more.